Homestead
Pre summary
Hello pilots, and welcome to another map guide. Today, we explore Homestead, a very open map with two main ceilings—the bridges on the left and right sides. Homestead sees a variety of enemy spawns; the only exceptions are monarch titans, stalkers, ticks (via drop pod), and legion titans.
Homestead can be very difficult for unskilled or incompetent pilots; this map, on every wave, will have a constant stream of drones from mid to the harvester. Grunts, mortar specters, and reapers will spawn, forcing players to seek them out and kill them. Sniper titans will spawn on waves 2 - 5, and mortar titans will appear a few times. Make sure all of these threats are dealt with to ensure the harvester’s survival. Waves 3 and 5 will be the hardest waves; this will be elaborated below, and the other waves are easier.
Waves remain manageable until the fifth, which is the ultimate test for the team. Buying arc traps is essential with no exceptions—avoid turrets unless attempting a challenge. Due to Homestead’s open design, Tone excels here, and Northstar’s tether traps are invaluable for stopping arc titans.
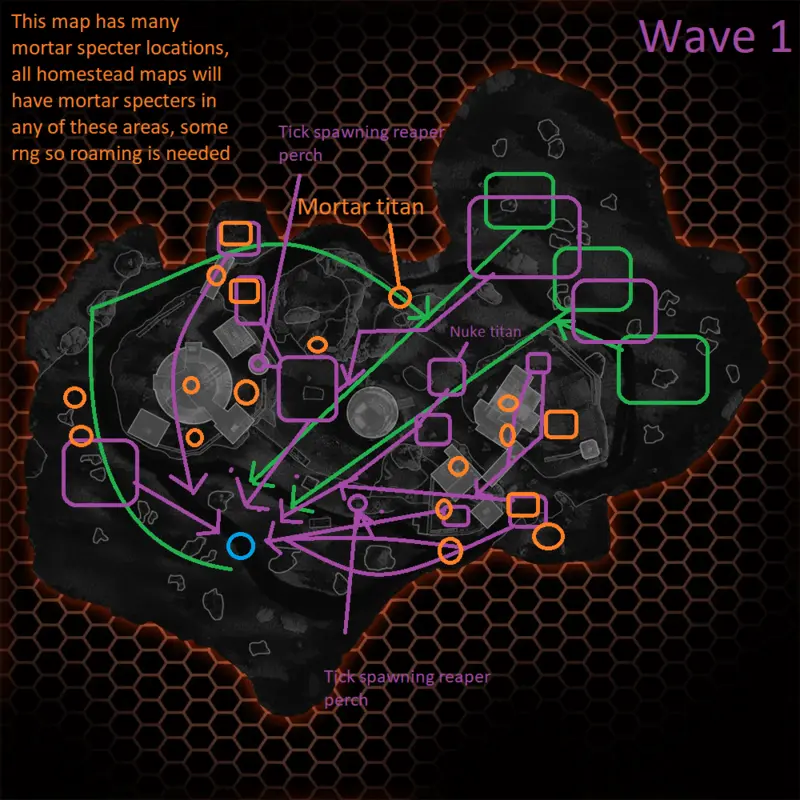
Wave 1
Wave 1 will have a lot of enemies coming at once. A nuke titan will spawn mid that enters the right side of the mid pillar. Make sure to lay satchels and have a pilot focus on killing it. Due to having no arc traps, the nuke titan will run if not engaged, so killing it is the top priority. After the nuke titan spawns, multiple drop pods full of grunts will spawn. The map below shows the many ways they enter to attack the harvester. Drones will spawn, so having a pilot with devotion or another good weapon at the back to kill them is a good idea. Having a sniper at the top of the pillar is a good choice; if a pilot wishes to do so, they can fight from a safe distance. While the grunts spawn, some reapers will spawn. These reapers will run to their respective tick-spawning locations (shown on the map below). These reapers need to die to prevent ticks from spawning. If ticks do spawn, they will run towards the harvester. Make sure to stay clear of the main path and destroy them. Cloak drones will accompany enemies on this wave, and kill them for an easier wave. Halfway through the mission, many mortar specters will spawn, so some pilots must seek and hunt them down. During the final parts of the wave, a mortar titan will spawn, as shown on the map below. Using this titan to farm batteries is highly recommended
Wave 2
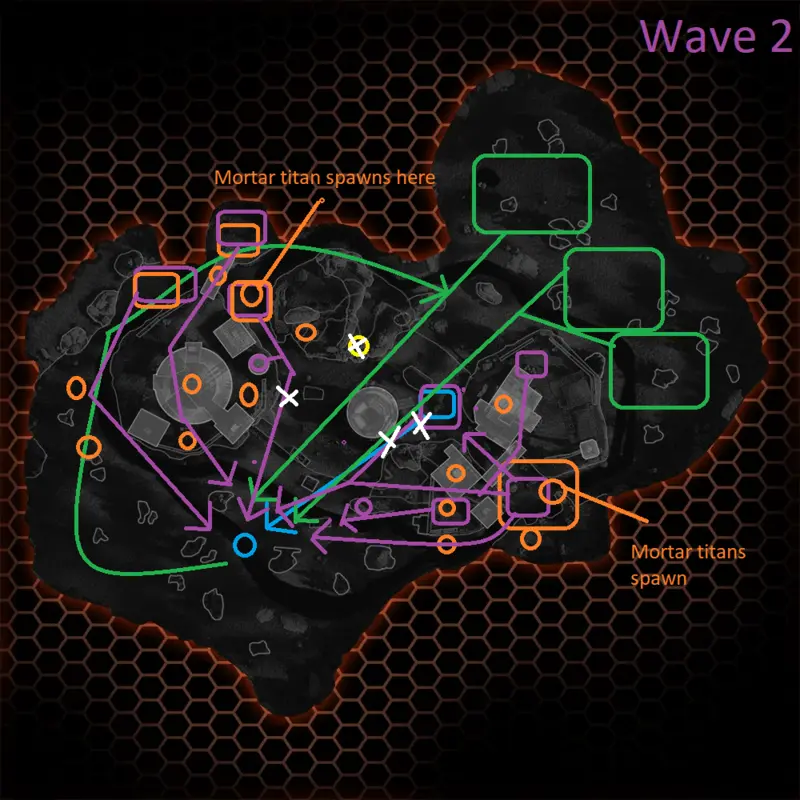
Wave 2 will start with grunts and an arc titan spawn. The right side will get grunts, and the left side will get enemies as well. Dispatch the arc titan with haste. The majority of this wave will have small enemies and a stream of drones that come in the middle. Consider having a titan that is good for killing drones, like a tone or monarch, in the middle to do enemy cleanup. Mortar titans will spawn on the right and left side, and deal with them when they spawn. Mortar specters will spawn and camp in any of the places on the map(shown below). One pilot should be on the right side, clearing anything in the way. Later in the wave, nuke titans, clocked drones, an arc titan, and a sniper titan spawn (shown on the map). This part is crucial and has resulted in heavy damage or losses if the team doesn’t work together. The sniper titan spot should be arc-trapped to buy time to kill the nuke titans. The nuke titans will enter through the left and right sides of the center pillar. 1 pilot should focus on the arc titan that spawns; it will always spawn on the right side. Make sure mortar specters are dealt with as they immediately damage the harvester. Have one pilot focus on the sniper titan.
Wave 3
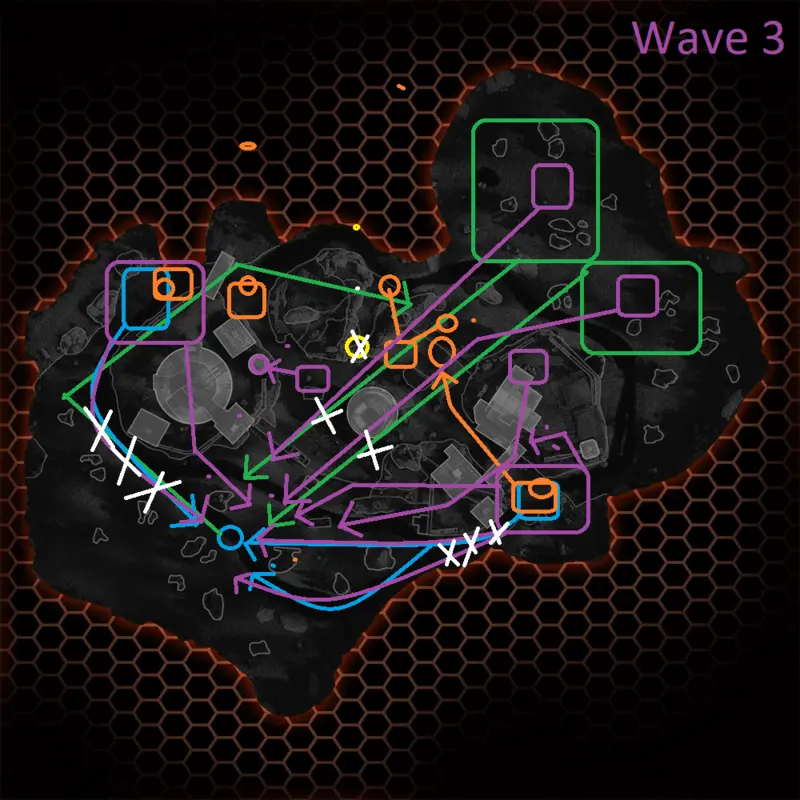
Wave 3 will test the team. Like always, drones will spawn mid and rush to the harvester. Make sure one titan stays behind to kill them and any grunts that come from the left and right sides. This wave will have more mortar titans; dispatch them when they spawn. The dangerous part of this mission comes when the right and left sides get ions first, then arc titans and nuke titans spawn shortly after. During this time, 2 scorch titans will spawn deep mid with cloaked drones. Make sure one pilot focuses on each side. Arc traps should be placed at the left and right choke points. A good team will communicate with each other and support each other. Range Titans will have the best chance of dealing with multiple angles. Grunts will make their way to the harvester promptly. Beware of that sniper titan spot. A Lot will happen at once, so having one pilot prioritize the right choke point, and another on the left side will be recommended. The left side has more space and length, so the left side will come later. Kill the arc titans that come asap. Cloak drones spawn on this mission, so do not ignore what they will hide as they prioritize the titans. Any mortar specters should be dealt with. Assuming no titan or pilot death and everyone is in the correct positions, this wave should be easy, and no harvester damage should occur. If unsure, buying a harvester shield can be a last resort.
Wave 4
Wave 4 is a breather from wave 3. This wave will have considerably fewer titans, just smaller enemies like drones and grunts. This wave starts with an ion and 2 reapers on the left side. Dispatch(get rid of) them. This is a good moment for a titanless pilot to earn a titan meter before the rest of the wave starts. This wave will have tone and sniper tone titans, the usual sniper tone perch will have 1, and then another sniper tone spawns to replace that one upon death. 2 tones will spawn, on the right side, they will follow the path to the left of the big rocks. The left side tone will go near the mid instead of the far left, making it easier to kill. This wave will have 2 scorch titans that spawn deep mid, making sure to weaken them from a distance with long-range attacks. Grunts will spawn on the left and right sides like usual, killing them with haste. This wave should end with everyone having healthy titans.

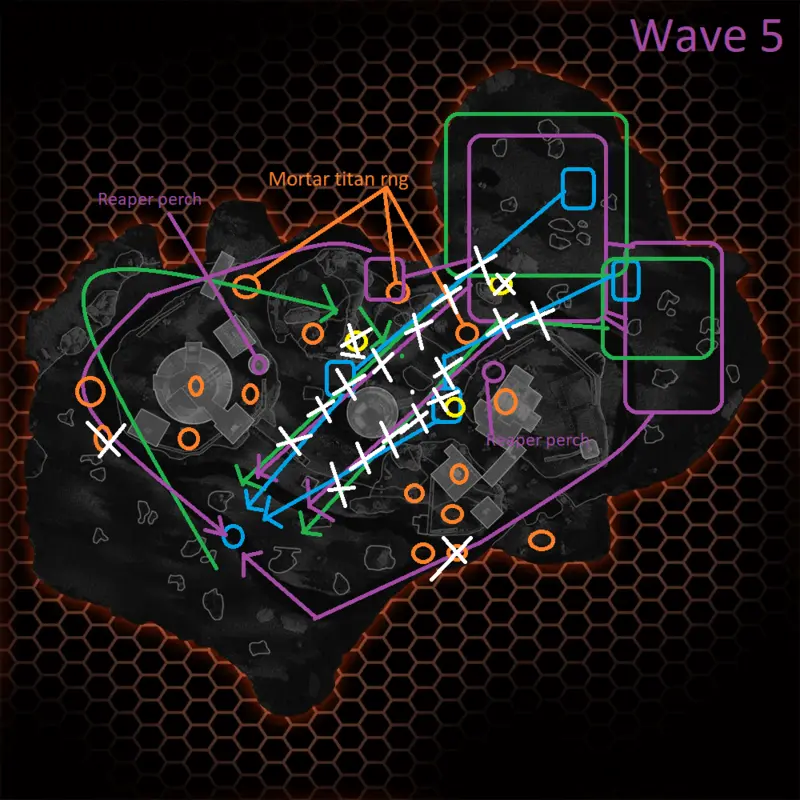
Wave 5
Wave 5 is going to have a huge number of nuke titans, with some arc titans, scorch titans, and drones. Supporting them will be cloak drones, reapers, sniper titans, and mortar titans. At the beginning of wave 2, arc titans will spawn mid, kill them, and then roam for mortar specter locations, as they will spawn before the major wave. Once that is over, deep mid will be getting nuke titans, a sniper northstar, and a sniper tone that will sit at the deep mid rocks. Now, a huge tide of nuke titans with occasional arc titans will run towards the harvester. Prioritize arc titans first, always, as they won’t be stunned by arc traps; the nuke titans will be slowed by them. Then afterward, keep an eye out for reapers and nuke titans that will deviate from the horde. They will come from the left and right sides, intercept if you can. Another priority target is the sniper Northstar and mortar titan that spawns. The mortar titans of this wave will have RNG spots (shown on the map), and the cloak drone will prioritize them. Have a roamer dispatch it asap. The sniper titans can be shot from a range in the back, so Northstars, Legions, Ions, and Tone titans should focus on them too. Scorch Titans will spawn near the end of the wave, so keep an eye out.
Lots of cloak drones accompany nuke titans, so if you see a cloak drone, assume a nuke titan is underneath it. Any pilots who are Ion or Northstar should snipe any cloak drones to prevent any mishaps. Reapers, this wave will go to the usual perch spots and spam ticks, so keep an eye out. 2 pilots, like a scorch or monarch, should focus on one side of the middle pylon structure. The battlefield smoke will block the enemies’ vision and yours. This will allow you to use close-range abilities like maelstrom or thermite without dying. With nuke titans always comes the risk of accidentally dying. Don’t crowd around too much, and don’t expose yourself. This wave is pretty straightforward. What causes losses is the negligence of killing the sniper and mortar titans and having fewer arc traps. The number of enemies can catch bad players off guard, as titan proficiency is a must for maximum DPS. This wave is much easier if all the money is spent on arc traps. Pilots must Arc trap the entire mid and mid choke point sections, and have at least one arc trap on the left and right side areas so the deviant reapers and nukes get stunned.
Post summary
Homestead can be a difficult map; make sure arc traps and player positioning are on point, and consider having a roamer or two. Watch out for waves 3 and 5, as those are the waves that cause losses. You either win or lose on this map. Ranged Titans work very well here. If a pilot uses a Scorch Titan, they should hold a lane by themselves, like the right side during wave 3 or mid to kill drones with the thermal shield.
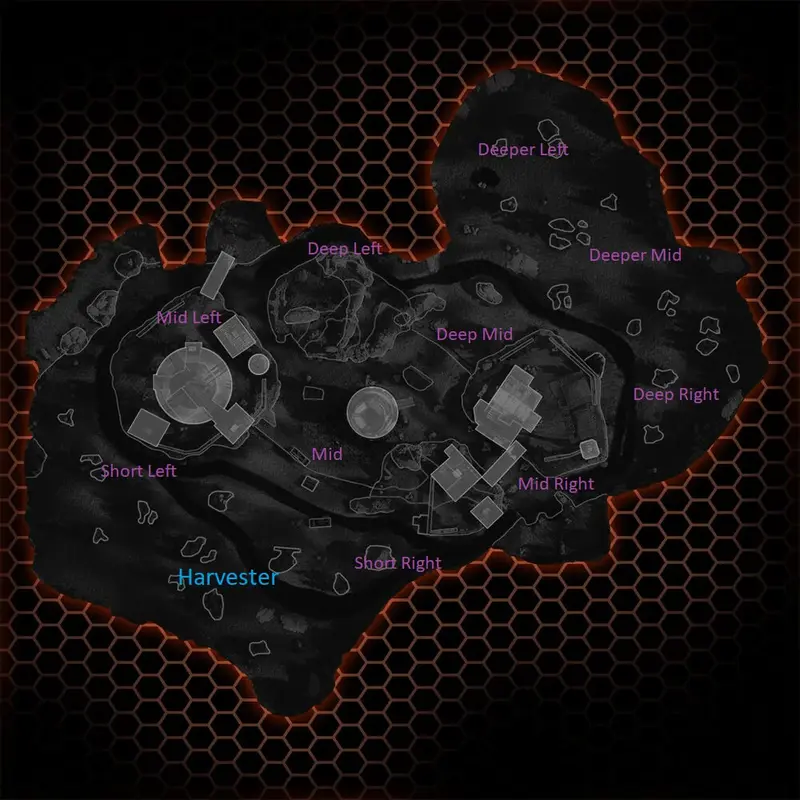
Map callouts