Forward Base Kodai
Pre Summary
Forward Base Kodai is considered one of the easiest maps in Frontier Defense. This map has lots of open terrain; the only areas with a ceiling are the tunnels in the middle of the map. The map size is medium. Very few drones and only 2 mortar titans spawn on this map, so roaming isn’t needed as much as in other maps.
That being said, sniper titans and other ranged titans can shoot at the harvester at a long range, making them a high priority when they spawn. These titans will only be able to shoot at a distance in the middle of the map, making the middle a key area to always control in every wave. Holding down the middle allows for the tunnels to be accessible and allows the left and right sides to be fired upon without pilots being close to their targets.
Fortunately, since this map is so open, it makes many titans and builds less punishable, specifically tone and monarch. For pilots, this map makes surviving nuke ejection or nuke rodeo much easier because of the lack of a ceiling. All players, if using ranged titans or weapons, should stay in the middle.
Wave 1
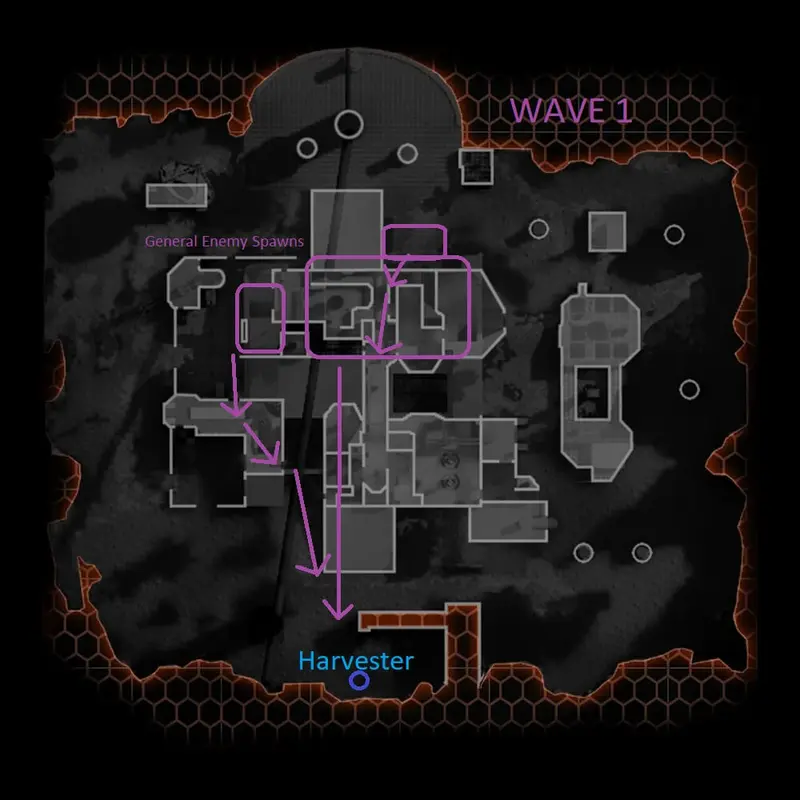
Wave 1 is pretty simple; grunts and stalkers will spawn in the middle in drop pods because stalkers can ambush you if you are caught out in the open. It is recommended that you either be a sniper in the back or stay back with A-wall. A Lot of enemies spawn and will keep spawning at once, so AOE weapons and ordinances excel here. Some grunts will spawn on the left and will enter the building on the ground level. They will go back up to the middle, so be prepared for an ambush if they aren’t dead already. 1 stalker pod will always spawn in the back; they will jump up to the mid area, so keep that in mind. Near the end of the wave, a sniper tone will spawn. Caution is advised if you are going to farm its batteries on master or insane, since the AI will be accurate and aggressive if a battery is pulled. One pilot should grab a battery right after it lands. If the tone detects no pilots it will focus its fire on the harvester dealing lots of damage if left untouched. Do what you will with this information.
Wave 2
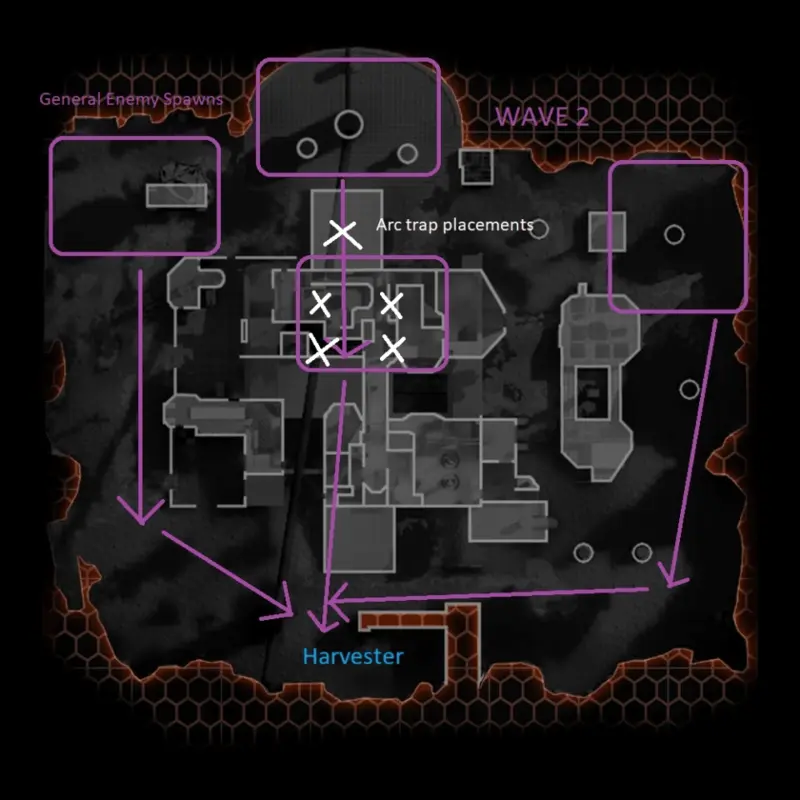
Wave 2 starts in the middle, drop pods full of ticks will spawn, so stay back and don’t be in the smoke until they are cleared. Once the ticks are dealt with, the next enemies that spawn are grunts, some reapers, mortar specters, and 2-tone titans will spawn. Use the smoke from the battlefield to shield yourself if needed. The left and right sides will get titans as well, tons, legion titans, and ions. Keep in mind that some grunts will spawn below and will rush to the harvester. Near the end of the wave, it will have scorches spawn. Easy wave to complete as long as you keep tabs on your surroundings.
Wave 3
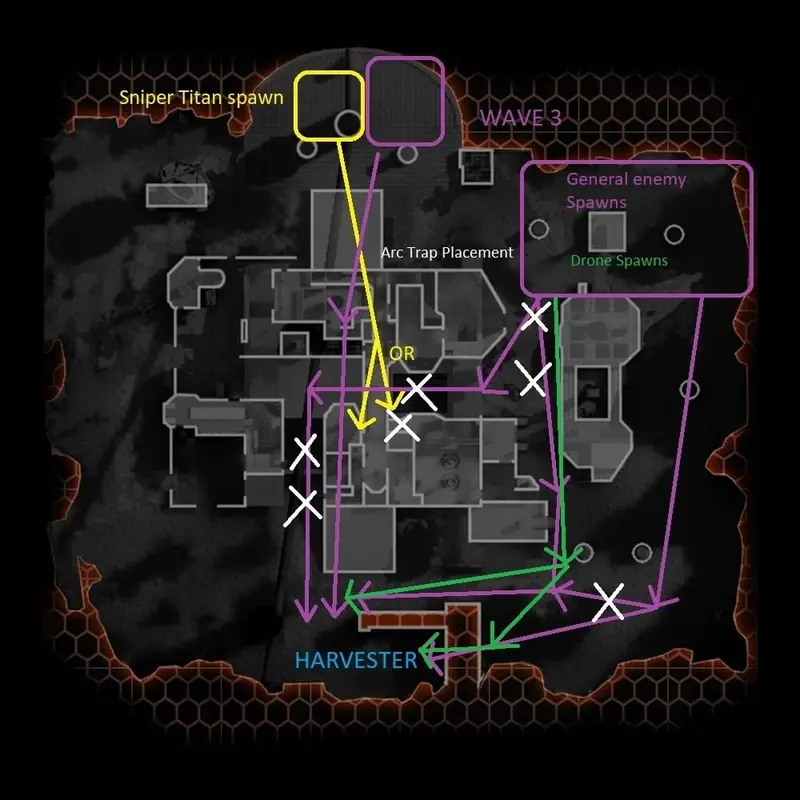
This wave will have enemies coming all along the mid and right sides. Some drones spawn this wave, but not much. Starting in the wave will be a cloak drone, then a ronin will spawn on the right side. After that, grunts and reapers spawn in the deep right side, making their way down. Then ions, tones, legions, and scorches will make their way to the right side. Some enemies will split down the path, as shown on the map. Smoke will be on the short right side, so use that if needed. Players should shoot and do as much damage to everything before it gets close to the harvester. While this is happening, the middle will get a sniper tone titan and a monarch, kill them as soon as possible to prevent harvester death, as they will kill it very fast if left alive. Some titans will go into the tunnels this wave, two ronins followed by 2 cloaked tone titans. Keep this in mind. After the majority of the wave is over, some more titans spawn deep mid. They usually come at the same time as the cloaked tone titans, so make sure to have one pilot covering the tunnel and have pilots cover the middle. All should go well if the middle is secured for the entire wave.
Wave 4
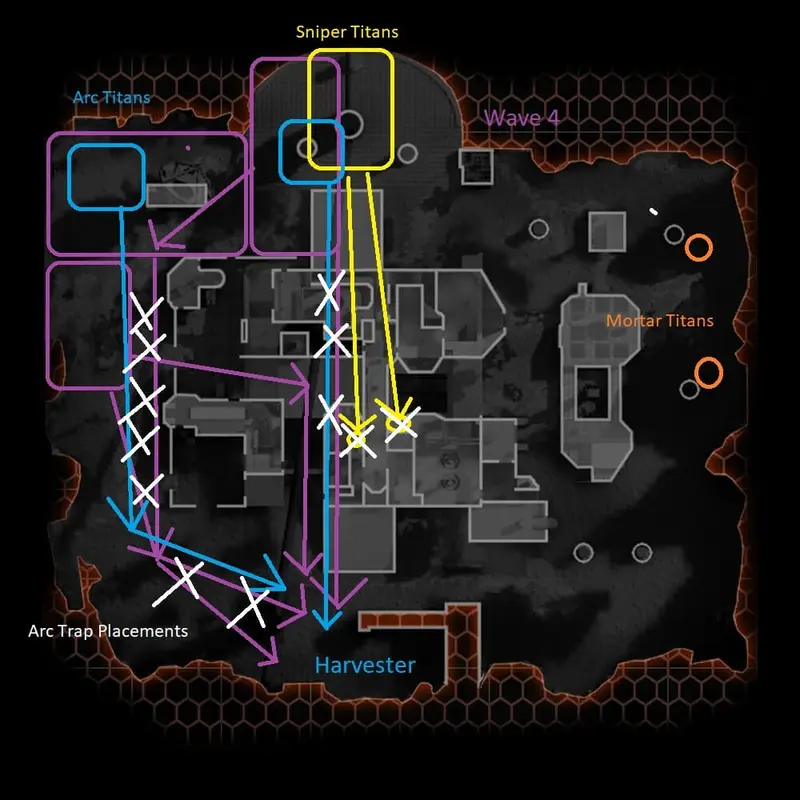
This wave will have all enemies but 2 mortar titans spawn on the left side and mid. During this wave 2, mortar titans will eventually spawn and will be on the right side, as shown on the map, and have one pilot deal with them. The left side will be getting a lot of action at first, followed by a big wave that comes down the middle. Wave 4 will be the hardest wave on this map because a lot of high-priority enemies spawn at once. The left side will be getting Ion, Tones, Nuke, Legion, and Scorches. A lot of stalkers will swarm the left side, so make sure traps are placed in those areas to deal with them more easily. The nuke titans that spawn on the left side will take a different route than the other forces; they will go into the tunnels and move next to the ramp leading to the middle. The other forces will take the long way to Harvester by the rocks and pillar on the short left, lots of smoke from the map spawns there, so make use of those, keep in mind it will be harder for Archer or Tone Titans to lock on inside those. Make sure whoever is in the middle takes advantage of attacking the nuke titans from above. Make sure not to peek at your titan when a nuke titan explodes, or else you will get damaged and possibly killed. The hard part of this wave comes after the first initial wave is defeated. The left side will get the same Titans but will now have 2 Arc Titans that need to die asap. At the same time, the middle will get some ronins and an arc titan, followed by multiple reapers with 2 sniper titans that will take the same positions, focusing on the harvester (shown on the map).
Any pilot that has AOE or penetration power like Northstar or Legion should be mid for this fight, as a lot of the enemies will line up, and a good pilot will make full use of that. Depending on what happens, mid will take priority most of the time, kill what’s up there first, then focus on short left. Near the end of the wave, a lot of nuke titans will come and follow the same unique path. This is a good time to farm core, batteries, and/or titan meter. Wave 4 will be the biggest test of skill for this map.
Wave 5
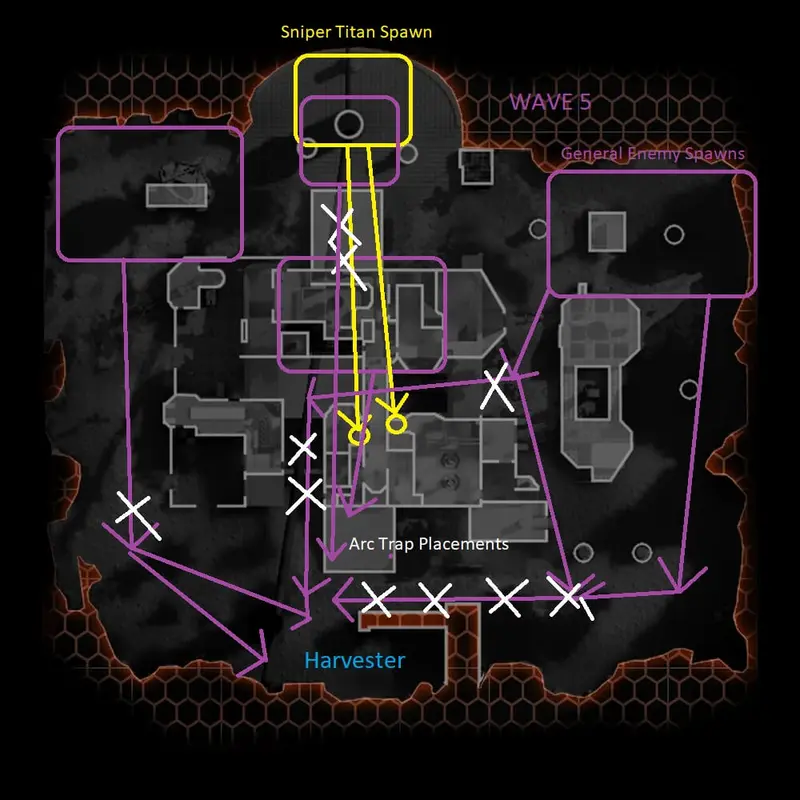
The last wave is a combination of the previous waves. This wave will start in mid again with ticks, this time with a bit more, followed by grunts and reaper spawns. Once they land and are dealt with, the deep left and deep right will have more titans consisting of Legions, Tones, and Ions, and the right side will be getting stalkers that move into the tunnels. This wave will be seeing lots of enemies moving through tunnels, so whoever is in mid will need to keep this in mind. Tunnels in mid will have reapers, scorches, and eventually a big wave of ions and scorches that go into the tunnels. The far right side will be getting some titan spawns. After some time, the middle will get two ions that will go mid, and make sure those are taken care of. Middle will also be getting Sniper Titans, so be wary of those middle pilots. Near the end of the wave, Nuke Titans will spawn left and right and will go the same route as other forces. The last part of this wave will have Titans spawn deep mid. After that, this map is completed. If you do not have many arc traps by now, this will be a struggle. It is advisable to place as many as possible in earlier waves.
Post Summary
Forward Base Kodai is a pretty easy map, a good map for relaxing and trying out new strategies and builds. Just make sure to keep the middle clear, as that is a staging point for all other operations that will take place. One more thing to remember is that sometimes an enemy will get past the defenses and will shoot at the harvester, making sure to go beyond the short wall to find out. The sniper titans and monarchs that spawn with them will kill the harvester; it’s not a matter of if but when. Tone and Legion are very good on this map. Ions Reflex Canon laser core also has a lot of potential on this map, and of course, Highlander Ronin will dominate easily, so the options are many. Have fun out there, pilots!
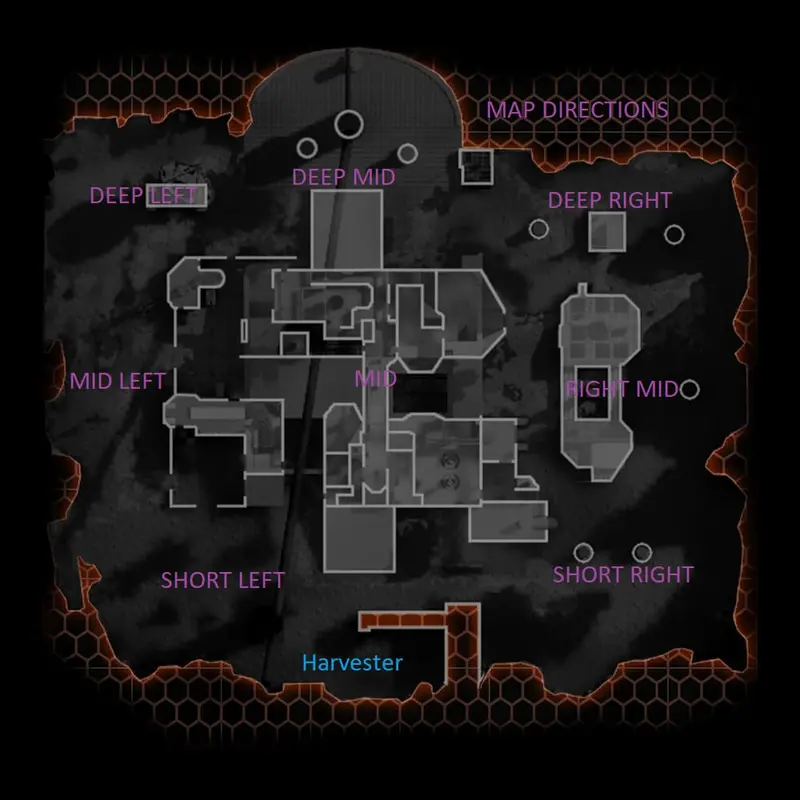
Map callouts