Exo Planet
Pre summary
Exo Planet is one of the hardest maps to win in Frontier Defense. This map has a huge number of mortar titans, nukes, scorches, sniper (tone) titans, drones, arc titans, tons of reapers, and tick-spawning reapers. Making this map very difficult and near impossible on master/insane without knowing the spawns. On a good note, this map does not have cloaked drones, mortar specters, Northstar titans, Ions, or Ronins.
The room for error is tiny since drones and mortar titans shred the harvester shields and health very fast. This map is big and has 2 main tight corridors with sharp corners that can be an advantage and a disadvantage. The left side of the map, being different from the middle and right, has more space and is very big.
Since this map is very big, roaming will need to be required for hunting down mortar titans. Long corridors make Northstar and Legion good choices. Scorch is always a good choice, in fact having 3 is a good call. Since this map is very difficult with many enemies that come very fast, monarch titans will need to be very skilled to not die and to deal enough damage to not be a liability. In other words, unless you are confident in using Monarch, don’t. Exo Planet is doable with a good team. Communication is a must so use those mics for effective real-time reactions, etc.
Each player, most of the time, will hold down a lane by themselves with someone supporting, so if you die, that will increase mission failure significantly. Even on master difficulty with a minimap, this map is still a huge challenge.
Insane makes this map a whole different level. Memorization is needed; leaving one drone or enemy by the harvester will mean harvester death. Look to the skies for Titan Falls and mortar titan rockets, and communicate with the team about what you see. If you think a reaper or anything got by you, make the call out as a precaution, as someone might be free to roam.
To make the exo planet easier, memorization of mortar titan spots is a must for arc traps. A visual representation of such locations is located on the maps below. The arc traps will buy time and disrupt mortar titan fire heavily. Consider using a counter-ready in your Titan kit to help with drones and to shield yourself from attacks.
Player skill and knowledge will be tested, so it is heavily recommended that you become proficient with your loadout and titan of choice before starting. There is very little room for error, so it is best to equip the best weapons and loadouts instead of the most “fun” or “cool” loadouts. Grenade launchers and satchels will do the best on wave one or with getting a new titan. Ronin and Scorch are the top 2 picks for this map. If the pilot’s skill is good, then the options can be expanded. Even with scorch, you can still die if you don’t know what you are doing.
Since Exo planet has many mortar titans, this map is a good battery and titan meter farming map, granted the harvester has shields still. If the harvester is healthy, then consider replacing your titan; do not hold onto doomed titans, since you will become a liability. This map is no place to test or to gamble. Don’t kill mortar titans if your team needs meter farming, hence why communication is a must for exo planet.
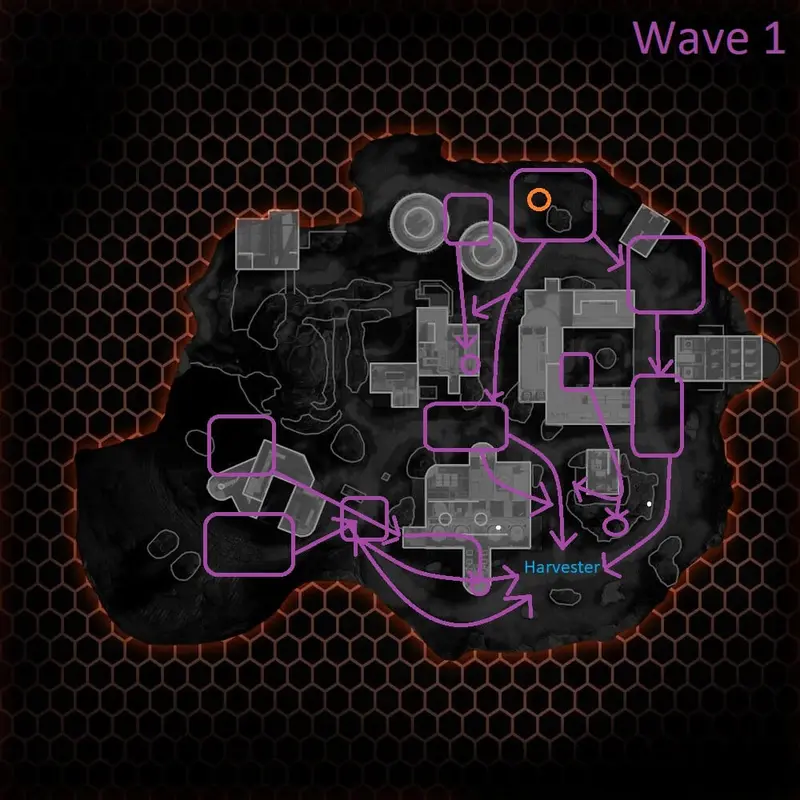
Wave 1
For wave one, one pilot should be deep mid, one mid, one short right, and one short left. For the pilot that is deep mid, they need to equip an anti-titan-focused loadout. Their focus should be to support mid until either a nuke, reaper, or mortar titan spawns deep mid. These are a priority and should be taken down first. If it’s a mortar titan first, kill it immediately. The reaper needs to die soon, or else ticks will spawn. There is some RNG with what spawns first, so keep a lookout. All pilots need to be aware that stalkers pre-fire their shots and can see through the map; shots can be avoided if the pilot moves quickly.
For the left side, the pilot needs to watch out for stalkers. Some will spawn short left first, and then some will spawn deep left and then enter the distant building. Grunts will spawn with stalkers. Some stalkers and grunts will enter the building and will surprise unsuspecting players. Make sure to kill everything from the roof safely.
For the player on the right, grunts and stalkers will spawn and move towards the harvester. Some grunts will move to the building and become stationary on the rocks or take a sneaky route to the harvester (shown on the map below).
For the pilot in mid, support all three sides if needed. A lot will spawn mid, so equipping a grenade launcher can help a lot. Stalkers, grunts, and the Titans, if they survive, will be in your vicinity. Deal with them accordingly.
If all the pilots are quick enough and know when their lane is done, they can farm batteries off the mortar or nuke titan that is left.
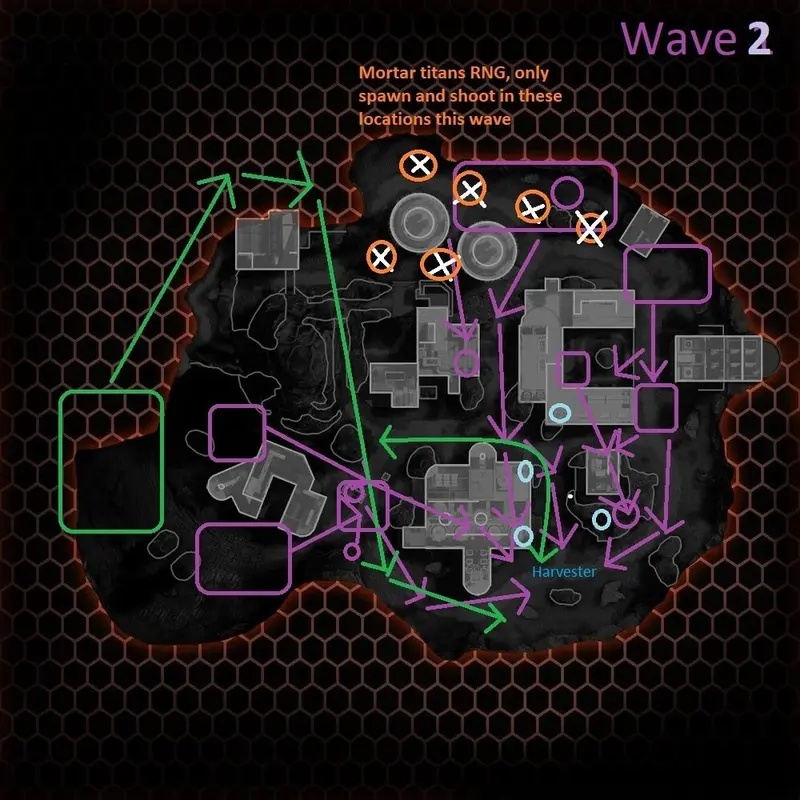
Wave 2
This wave will spawn a ton of reapers quickly on the left and right sides, mid will get nuke titans, legion titans, some tone titans, and mortar titans. Aoe-like electric smoke is recommended. Mortars on deep mid should be arc-trapped.
For this wave, the left side will have reapers and drones. Make sure all of the reapers die, or else some will do parkour and hop the building to your right. They use that as a shortcut to the harvester. Drone spawns on the left side will come from the opening from mid. If any reapers escape, hunt them down or communicate with the team.
The right side will get grunts that will rush into the building that’s next to the harvester; they will begin shooting the harvester immediately, so kill every grunt before they enter the building. Some stalkers will spawn mid, so dispatch them when they are visible. Reapers will be coming from mid into the right side, so any splash or penetrating attacks like northstars or legions are very good.
Mid will receive the most and, as such, will need two players to defend it. One person should hold mid-down and prevent anything from reaching the harvester. The second player can be deep mid and roam, or ambush enemies. The roamer should kill the reapers that go mid to prevent them from perching (that is shown on the map below) since it will cause significant damage and annoyance to the mid-pilot if left alone. Once each lane is cleared, communicate with the team if anyone needs a new titan like usual. The left side and right side should be done first in a perfect world.
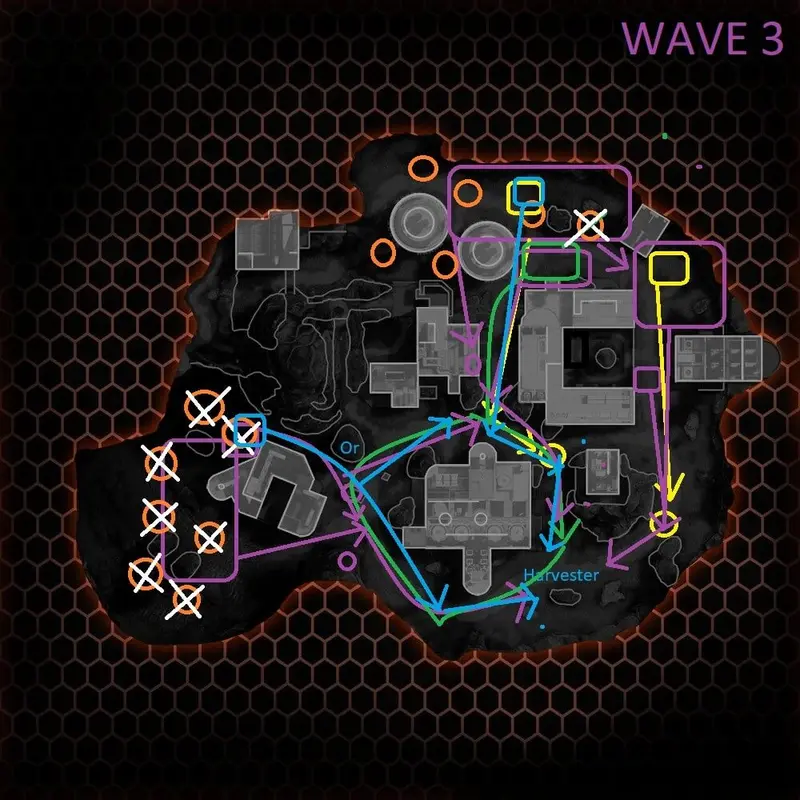
Wave 3
This wave is much harder as this is when the mortar titan numbers increase and are spread apart more, this wave has 2 parts, the main attack force comes in all at once, and once that is dispatched then the mortars come with monarchs and scorches that spawn mid and left, at this point, each lane including left will have scorch and a monarch coming after harvester, act accordingly, this wave sees the left side getting more action as well. This wave will have drones, arc titans, reapers, legion, tone, nuke titans, monarch, and scorch titans. Mortars on the left side should be arc-trapped.
For this wave, one person must stay mid and kill the arc titan that comes; stalkers spawn behind it. 2 people at mid are good, one person (preferably the roamer) at the mid can support the left or right side if needed. The lanes must be cleared asap so the mortar titans can be hunted down. If they are arc-trapped, this will be much easier. If any mortar titans spawn mid-early, try your best to dispatch them. Make sure to dispatch drones so they don’t go too far up mid. Mid will get lots of Titans.
Whoever is on the right side will need to stay there for the entire duration of the match, until the mortar titans and scorches spawn, then they can push up. You will be getting a lot of titans, such as Tones and legions. Make sure to ask for help if needed. Kill drones if any spawn.
The left side will be getting a good amount as well, someone who is fast is preferable here but assistance from mid would be good too, the left side will be getting 2 drop pods of stalkers, and then immediately after 2 mortar titans will spawn in, after they spawn in reapers, legion and tone titans appear, one of the reapers will perch and start producing ticks, while others will either go mid or parkour on top of buildings to harvester. The left side has an advantage in that there are choke points; use these when you can. Whoever is on the left side, be warned that there is an arc titan that spawns on the left side, and with RNG, it will either go mid or go straight to the left side, endangering harvester or mid players. Make sure to kill it before that happens. If you are left, you will stay there for the duration of the game. Depending on what you do, it is recommended that you dispatch the mobile enemies first before engaging mortars, unless you are a ronin. If you can, it is recommended that you have 2 people left side to cover the bigger area. In a perfect world, right and mid won’t need help.
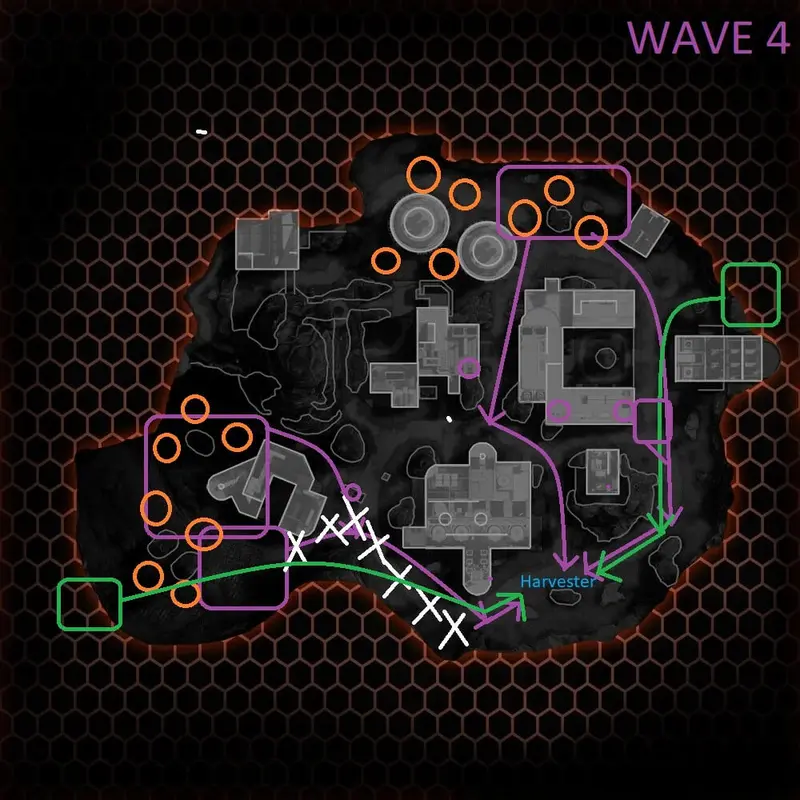
Wave 4
Wave 4 is the deciding factor if the match will be won or not. This wave is simpler but much more brutal. This wave will have drones, scorches, reapers, a nuke titan, and some stalkers. After the scorch waves, the deep mid and deep left will be getting tons of mortar titans, so roam as soon as the scorches are dead. Left-side choke points should be arc-trapped
The left side is going to have the most action in this wave, so 2 pilots are needed for the entire time this wave. The left side will start with some mortars spawning deep left and a few other enemies with drones. These drones will come fast; make sure to keep an eye out. Whoever is on the left side needs to deal with and kill everything before the left side scorches spawn. About 9 or so scorches will spawn, and no one will survive this without help. So, once the scorches spawn, both pilots need to immediately retreat to the short left and use the choke points.
Mid will receive some action, but only 3 scorches spawn immediately after the wave starts. After they are dispatched, mid is pretty much clear for the rest of the match. The mid player should help the left side after the 3 scorches are dealt with, and if any subsequent enemies at mid are killed.
The right side will only receive some stalkers and drones, and eventually a single nuke titan. The right side won’t get much action, so whoever is on the right side should go deep mid to hunt for mortars when they spawn. Just make sure to kill the drones that spawn in.
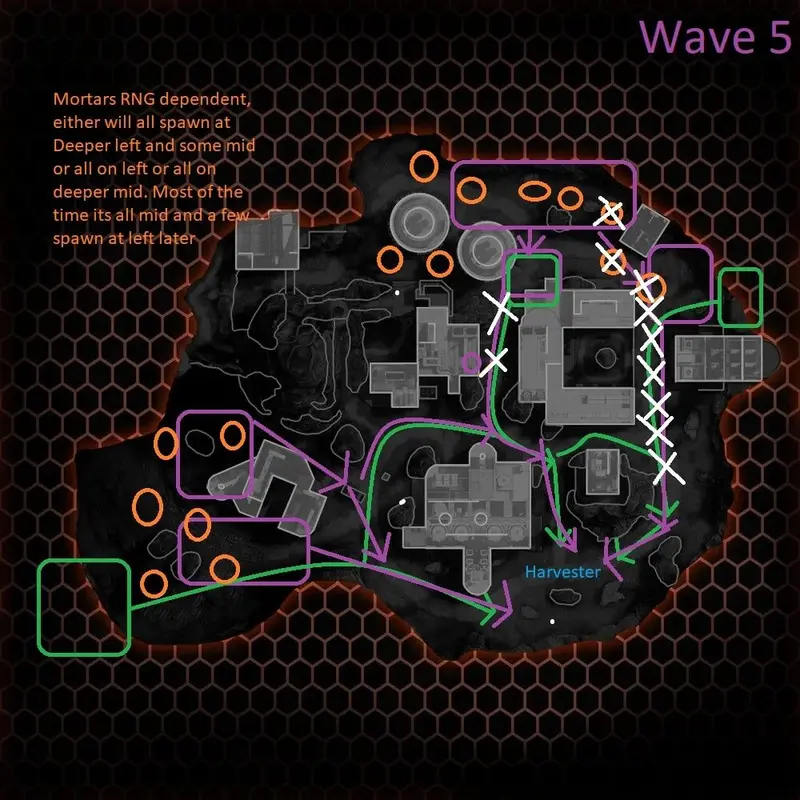
Wave 5
Wave 5 is the easiest of the waves. This wave will have tons of nuke titans, drones, reapers, stalkers, tones, mortars, and legion titans. All three lanes will have drones spawning in. Some mortar titans will spawn left, and some will spawn mid-early in the round. Rarely, there is RNG where all of the mortars will spawn on the left side instead of the mid or right side. If that’s the case, then 2 people should be on the left side asap. After the main portions of the waves are dealt with, the most amount of mortar titans ever will spawn deep mid and deep right. The right side should be arc-trapped
Mid-lane should have 1 pilot for the entire match, mid won’t get too much but will get drones and some titans. The mid-pilot should take out any mortars that spawn early. Keep mid-clear; this will help the right side considerably.
The right side will get the most action near the beginning of the wave. Lots of nuke titans and some other titans will be streaming down the right side. With the proper support and arc traps, this shouldn’t be a problem. Right-side pilot(s) should push up once the right side is clear to kill the mortar titans that will be spawning.
The left side will be getting lots of action this round. In the beginning, only one monarch and one mortar will spawn. Use these to farm core and such. Soon after, drones will start coming from the waterfall, so make sure to deal with this accordingly. After the titans are killed, stay on the left side and look for more drones. Keep an eye out for a rare RNG that spawns mortar titans on the left side instead of the right and mid-side. Soon, a trickle of nuke titans will come from the left that go to the left side, some will go mid and cross over to the right side, making them easier to kill. After the nuke titans spawn, the left side will always get some mortar titans near the end, making sure to destroy them as well.
Post Summary
A huge amount of information to digest at once, it is recommended that if you are new to Exo Planet, you should play it on master difficulty first to memorize spawns visually before tackling insane. Good luck with randoms and expect the worst. Harvester shields can carry and are useful for slip-ups. Try to get a capable team together with mics. As said above, this map requires you to be at your best; if one person falls, then the whole plan can fail if crisis control doesn’t work. For the best comp, I suggest 3 scorch 1 highlander ronin, or 2 highlander ronin and 2 scorch. Northstar and Ion can be good as well to replace the Ronin. Legion is also an underdog with exo planet, but only very good players should use him. Make sure to farm the titan meter and core with the mortar titans. Good luck out there, pilot, you’re gonna need it.
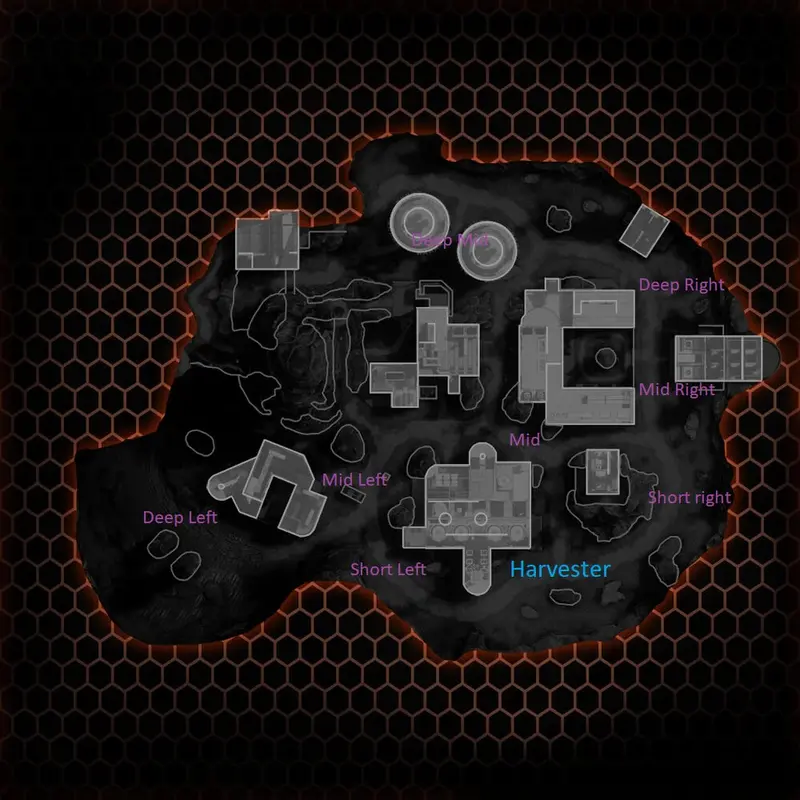
Map callouts