Drydock
Pre Summary
Drydock can either be very difficult or very easy, depending on what the team of pilots does. Preparation is key, and knowing how to avoid throwing the game by underestimating situations is a must. The terrain for the drydock is open on the outskirts, but it will have ceilings and tight corridors around the harvester itself. The harvester, however, is in the center of the map, making the harvester very vulnerable to rushes. Drydock is not a very big map, so enemies will quickly enter if not blocked or destroyed in time. Luckily, most enemies will move counter-clockwise around the map before moving to the harvester. To counter this, Legion, Northstar, and Scorches can do well by making use of arc traps and tight spaces. Tethers are very helpful in preventing Arc Titans or Nuke Titans’ advances. Keep in mind that those who use nuke ejects should equip phase shift since the ceilings are bound to kill you from your nuke ejection.
This map is fairly easy, other than some waves and part of the waves (which will be discussed below). This map will have tons of Arc Titans and Scorches spawn, two of the most dangerous titans in frontier defense, and it doesn’t help that this map makes them even more dangerous. I suggest looking at their respective battle reports for specific information on them. This map will not contain Monarchs, Ions, Mortar Specters, or Northstar Titans.
Pilots will need to make use of electric smoke in drydock to prevent death to themselves or the harvester, so equipping a double counter is wise. The mortar titans that spawn on wave 5 have been the cause of many defeats. Make sure they are arc-trapped (shown below).
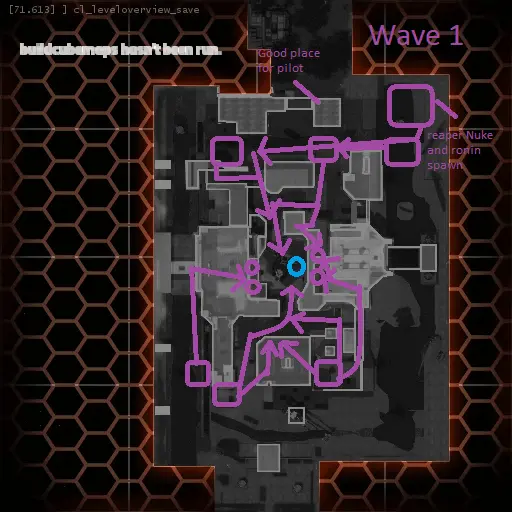
Wave 1
Wave 1 will have a lot of grunts, stalkers, and Nuke Titans in the first wave. 1 pilot should focus on the grunts and stalkers that spawn at 5, 6, and 7 o’clock or the back left corner, back, and back right corner. Many groups of stalkers and grunts will go towards the harvester, so make sure AOE is available. Another pilot should kill the grunts that spawn at the left side or 8,9 o’clock. If those grunts are left unchecked, harvester damage will happen. This pilot will assist with the back pilot if needed. For 12 and 1 o’clock, the deep front, front right corner, will have stalkers, reapers, and nuke titans with a Ronin Titan last. The pilot or pilots who cover this area are recommended to have an anti-titan loadout. Since stalkers spawn here, make sure to use cover and stay back to prevent dying. Whoever is back here should make use of the opportunity to farm batteries off the Nuke Titans that spawn. If the Nuke Titan gets passed, you make sure to communicate with the team. Wave 1 can get out of hand fast, so make sure to help each other out if needed. One final note is that a ronin will spawn; this is a good opportunity for the back pilots to get a battery if they wish. Strangely, if the titan is damaged, it will sometimes run off to the area between 10 and 9 o’clock, allowing time to farm batteries.
Wave 2
Wave 2 will have lots of ticks and some mortar titans. Any titans that roam MUST keep the tick spawn in mind, or else a lot of hull damage will occur. As shown on the map below, some key arc trap locations to reduce the tick numbers will help. To start, a Tone Titan will spawn at 5 o’clock in the back right corner. Good for monarchs or ronins to farm the core. As shown on the maps, the ticks will spawn at the bottom, front sides, and near-Mortar Titan spawns. Sometime during the middle of the wave, Ronins and Arc Titans will spawn at 1 o’clock, front right corner. Make sure they are dispatched in time, or else the harvester will suffer. This wave is pretty easy, just make sure to have healthy Titans by the end.

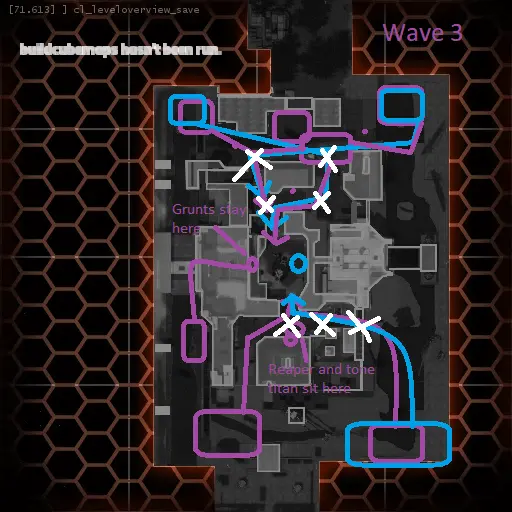
Wave 3
Wave 3 is very challenging and should be prepared for. Wave 3 will have a lot of enemies that will attack the harvester from all sides and corridors. This wave will have a good amount of Nuke Titans and Arc Titans. To start, stalkers will spawn at 12 o’clock, deep front, and some at 5 o’clock, back right corner, and 7 o’clock, back left corner. Sometime during the middle of the wave, the back areas will get tone titans and then arc titans with reapers. Kill the reapers asap as they will spawn ticks as shown in the map below, one pilot should take the backside for the whole wave. While this is happening, at 11, 12, and 1 o clock, the front left corner, deep front, and front right corner will be getting reapers, Arc Titans, and Nukes, these titans will go to the further entrance instead of the closest one relative to their spawn. 2 pilots are needed as multiple titans will come at once, AOE will be needed. Electric smoke and Scorches can hold this well. Make sure the choke points are arc-trapped to prevent Nuke Titans from running in. This wave will be a good test. Good luck.
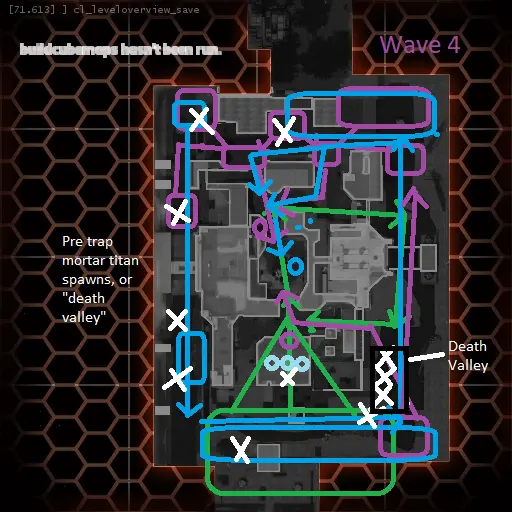
Wave 4
Wave 4 can be easy if prepared for; this wave will start with many drones that come from 6 o’clock, deep back. Make sure all Titans and pilots are prepared to kill drones. To draw the drone fire, one pilot should be outside of the harvester area so the drones shoot missiles at them instead. When a majority of the drones have fallen, Tone Titans will spawn at 5 o’clock and in front areas. Make sure to split forces when needed and don’t leave 6 o’clock alone until all drones have died. Once all of the drones have died, all pilots should focus efforts on 1, 12, and 11 o’clock as this is where the majority of the wave will spawn. Reapers and stalkers will spawn en masse. Some tone and arc titans will spawn at 10 or 11 o’clock, Front left corner. As shown on the map, they will move counterclockwise. Wave 4 isn’t that difficult, so nothing more will need to be elaborated. Make sure that the back is covered by a pilot.
Wave 5
The final wave is the deciding factor if a match will be won or not. A total of 8 mortar titans will spawn for this wave. A huge amount of Arc Titans and Scorch Titans will spawn, supplemented by Tone and Nuke Titans. Each Arc and Scorch titan that spawns will make 2 revolutions around the harvester before entering any of the entrances to attack the harvester. Allowing the pilots to deal damage to them before they enter, keep in mind that the Tone Titans and Nuke Titans don’t follow this rule; they will attack after 1 or a half revolution. Pilots who roam will need to be very vigilant and careful not to die since they will meet many Arc Titans face-to-face. To make this wave much easier, 2 or 3 pilots should focus on all firepower and camp at “Death Valley” as shown on the map, if the choke point is full of arc-traps and has good pilots that can destroy everything that walks through there. This wave will be very easy. To start, cloak drones will spawn, and then a few Arcs, some Tone Titans, and Nukes will begin to deploy at the back right corner, 5 o’clock. During this time, some tone titans will spawn at 11, 12, and 1 o’clock, front left corner, deep front, front right corner. They will make their way to the harvester shortly; some grunts will spawn and camp near the harvester as well, warranting 1 pilot to stay behind and defend the harvester itself. For the whole wave, arc titans and then later scorches will be the main bulk of the enemy army, they will all spawn at 1, 2, 12, 11, 10, 8, 7, 6, and 5 o’clock, deep front, front right corner, front left corner, left side, back left corner, deep back, back right corner.
They will all go clockwise and will always cross paths with Death Valley. During this wave, 2 rounds of 4 mortar titans will land; these must die, or else harvester death is inevitable. Luckily, this map has many ways to dispatch them from a distance, as shown below. Once all mortar titans are dead, then all pilots should focus on clearing the rest of the forces out. In a perfect world, this map should be easy, but unpredictable things will happen, so prepare for the worst.

Post summary
Play this map a few times on lower difficulties if you have never played this map before. When confident, do master, and it will become easier as you remember spawns, respect the tick spawns, and you should be fine for the 2nd wave. For the last wave, just make sure to hold down Death Valley. Nothing else of note other than taking down those Mortar Titans, consider having 2 pilots do that while 2 hold down Death Valley. Drydock can be one of the hardest or easiest maps with the proper team. Have fun!
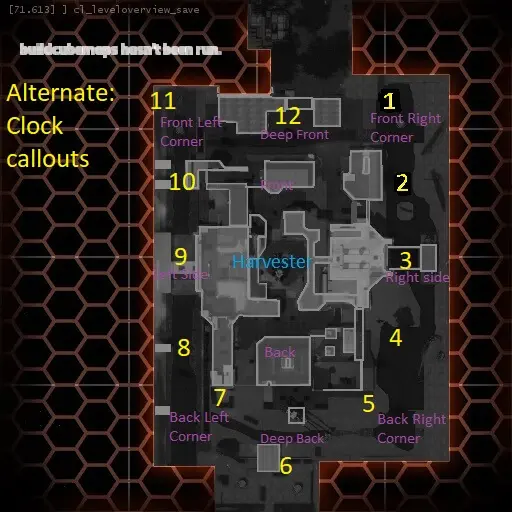
Map callouts
Wave 5 mortar titan locations that can be shot at from a safe distance
