Colony
Pre Summary
Hello pilots, and welcome to the Colony Frontier Defense guide. Colony is an interesting map with some quirks and diverse IMC units. To start, this map will have some waves that contain drones and mortars. All enemy types spawn on Colony. This map will have key areas covered in smoke from the sky (a map feature) that will prevent both IMC units and militia forces from being able to see through them, except with a threat scope or Northstar’s threat optics kit. These will provide cover for titans to sit in; the smokes will be explained further in the waves they spawn in. Colony can be surprisingly challenging, as there are a lot of enemies that can come flooding in. This map also has enemies split off between two lanes or take deviant angles towards the harvester, causing dire situations to arise if the proper precautions are not taken. This map will also have reaper perch areas. The reapers in Colony are weird since they inconsistently occupy perches if left alive. Reapers will occasionally skip perch areas in favor of attacking the harvester head-on. Pest control will be needed in Colony as there are grunts, drones, reapers, and stalkers. This map will also have sniper Northstars and sniper Tones on every wave except wave 1. Anyone who plans to do a pilot only on this map will need to take extreme caution, as the sniper titans will focus on pilots on the battlefield, and they rarely miss. As for militia titans, stay behind cover and use areas to peek in(will be explained in each eave). Arc trap placement can help considerably with the sniper titans. Mortar titans spawn on wave 2 and wave 4; these aren’t much of a threat if they are arc trapped. All of the sniper titans that spawn on Colony will not harm the harvester, making them perfect titan meter and battery farms. If you dare to ride them, it is recommended that you equip a cloak to avoid death. This map contains cloaked drones on many waves. It is crucial that they are destroyed to prevent a glitch where they won’t despawn. If all cloakable enemies are dead, any remaining cloak drones will not despawn, causing a soft lock in the match, so you must kill all cloak drones before killing the last enemy(usually a sniper titan). This map is in the upper echelon in terms of map difficulty, but it can be much easier with proper arc trap placement and good positioning.
Wave 1
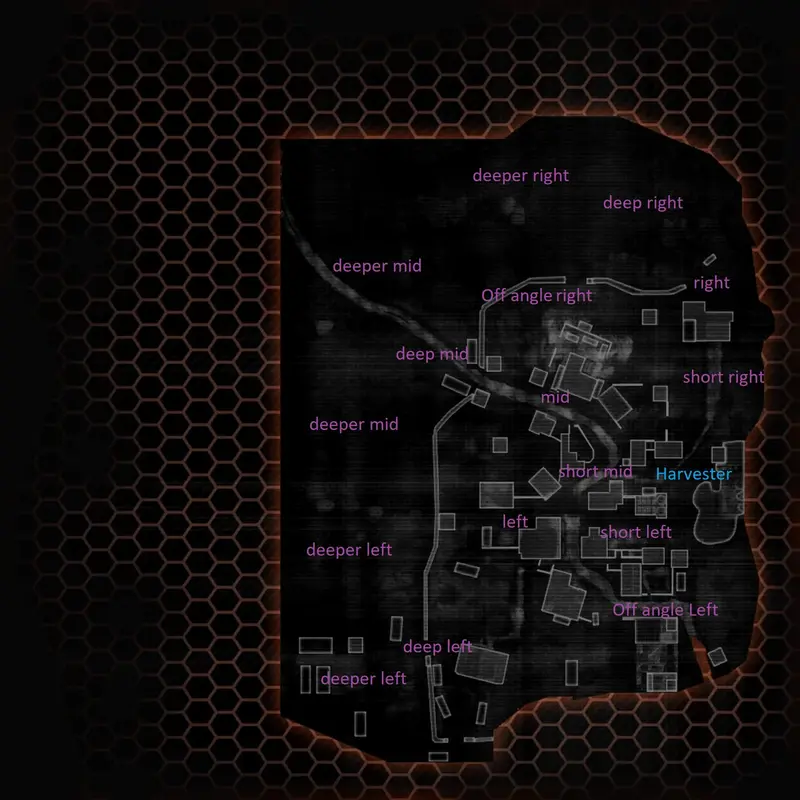
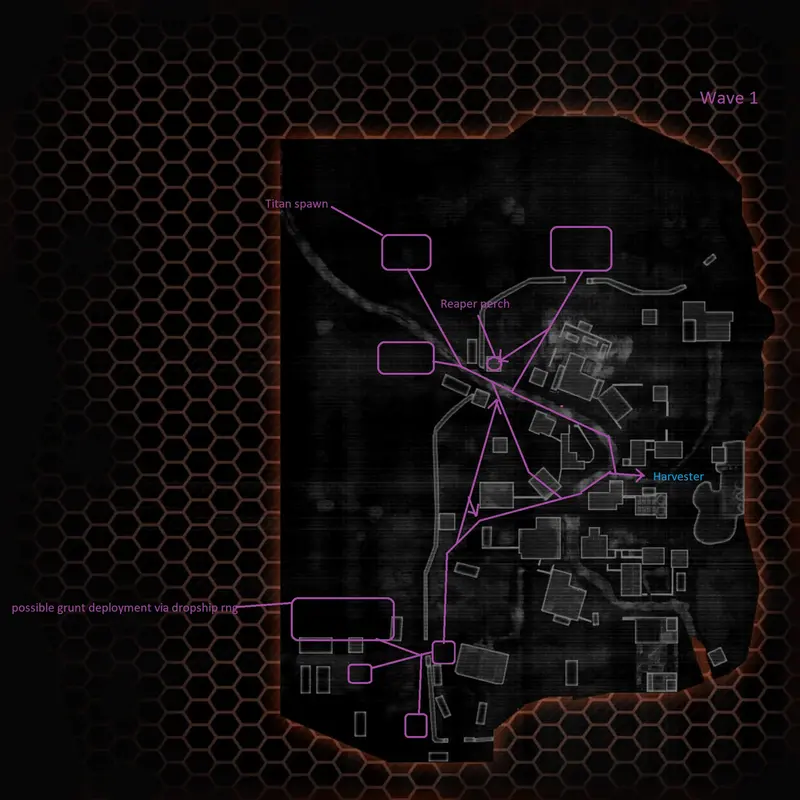
Wave 1 begins with map smoke deploying on the 3 main entrances, these entrances are at off-angle right, deep mid, and deep left. Grunts will begin to spawn out of dropships or drop pods in each of the areas behind the smoke, soon after a Legion titan will spawn in deeper mid, it will make its way towards the harvester via mid and short mid pathway. This titan is a good choice to farm batteries, but don’t be worried if it dies, as there is another random titan that will spawn in the exact same area again later in the wave. Stalkers will soon appear after the 2nd deployment of grunts, so extreme caution will be needed. Wave 1 has a lot of stalkers, so it is recommended that pilots use sniper rifles and grenade launchers. Stalkers can be unpredictable and can shoot a pilot through the map smokes, so be very careful. As shown in the illustration, some grunts will take off at angles, so keep this in mind. Once the smoke dissipates, reapers will begin to spawn in deeper left and off-angle right. Kill the reapers to prevent possible perching, as ticks will make everything way more dangerous. Once most of the enemies are dead, a second titan should be making its way to the harvester. Use this opportunity to get a battery, but always make sure the harvester isn’t touched.
Wave 2
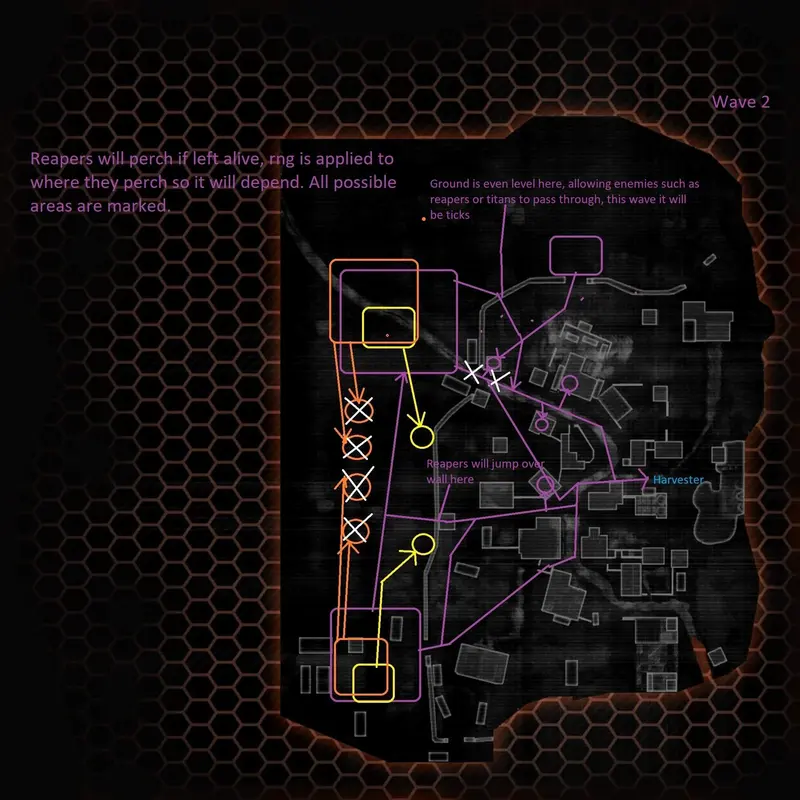
Wave 2 will have the majority of the wave focused on the deep mid to mid lane. It’s very important that there are at least 4 arc traps for the mortar titans, as they will harm the harvester (shown in the Illustration). Due to the sniper titans, they should be killed immediately as they will chip away at titan health or kill any pilot only players, very annoying to deal with. One person should make use of the map-deployed smokes, but be warned, there are a few tick drop pods at the beginning of the mission that spawn behind the map-deployed smokes, after that no more ticks spawn in drop pods for the rest of the match. Deeper left at the beginning of the wave will start spawning stalkers, grunts, and some ticks that will make their way towards the harvester. Some titans and reapers will spawn in deeper left and will split up between going towards sniper spots(if they are sniper titans), or towards deep mid pathway to join the main IMC force. One Monarch and reapers will move towards mid and short mid on the other side of the wall; any surviving reapers will be perched in the areas in the illustration. Some reapers and other small enemies will also spawn in the deeper mid and off-angle right side. Reapers will also vault over the wall that separates the two halves of the map, so never go too far forward. Mortar titans will begin to spawn and will arrive towards their spots and begin to fire upon the harvester soon after they titanfall. If they are arc trapped, they will be heavily distracted by the stuns, buying the team significant time. Soon after the ticks, grunts, stalkers and reapers spawn, a wave of titans will begin to converge in the deep mid choke, they will proceed to short mid and focus down the harvester so it is very important for whoever is going to hold this lane is capable of dealing with Scorch, Legion, Nuke titan, Tone and Ion titans that come in in brute force. Luckily this map has map deployed smokes in very convenient areas, right at the choke point, so to make this wave much easier one person, preferable a titan like Scorch, Monarch or any titan with aoe can body block and spread electric smoke for massive aoe while inside the map smoke for essentially free damage, and since the smoke blinds the enemy they will be sitting ducks to any ability, such as maelstrom or thermite. The other map deployed smoke in deep left can be used in the exact same way, so 2 pilots should have the role of body blocking and holding the choke while the other two pilots stay back more and play more of an auxiliary role in dealing with pest control, sniper titans, or other threats. Near the end of the map, all of the sniper titans should be dealt with, and the mortars should be left to battery and titan meter farm if needed. The sniper titans can be used for battery farming but that is basically playing russian roulette with 6 bullets in the chamber.. In a 6-round revolver.
Wave 3
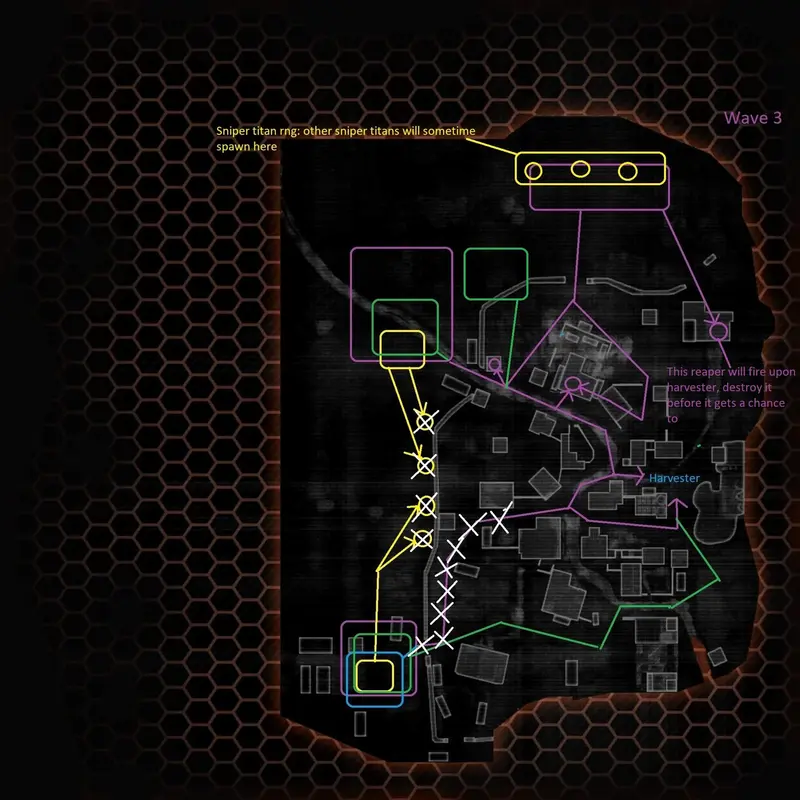
Wave 3 is a bit easier as there are no more mortar titans, so all arc traps placed for mortars should now be picked up and placed elsewhere. This wave will now have the majority of titans go towards the deep left choke versus the deep mid choke. Arc traps should be placed in the deep left choke point and all of the sniper titan locations to make the sniper titans much easier to deal with. Titans that go through the deep left choke will head towards the harvester in the left lane that then leads on to the short left or short mid, they will either split up or go down one of the paths, this can be incredibly tedious to deal with so prevent this scenario from happening all together by having one or two pilots hold the deep left chokepoint while inside the map deployed smoke. The other two pilots will have to do pest control as plasma drones will spawn on this wave. They will, as shown on the map, spawn in deep mid, deep left, and off-angle right. Some drones will also go on the off-angle left side. So to start this wave will have large number of titans and reapers that spawn in in the areas of deeper mid and deeper left, additionally 5 reapers will warpfall in deep right, these reapers will then proceed to climb onto perched areas, make sure these reapers die as soon as possible or else ticks and reaper rockets will be fired upon militia forces, one particular reaper will actually fire upon harvester so he must die, he perches on top of the right side building, it’s important to remember that some reapers will vault over the wall that separates the two parts of the map so don’t get surprised. In the meantime, sniper titans, Ion, Tones, Legion, Monarch, and Ronin titans will begin to stride to the harvester via the deep left checkpoint soon after the first portion is destroyed 2 arc titans will spawn deeper left; they will go towards the harvester like the rest of the titans. Lastly, another wave of enemies comes along, which will have a nuke titan or two in it, so whoever is holding the choke will need to keep that in mind. Also, the map deployed smokes do not last forever; be extremely careful so as not to be in a scenario where you are out of electric smoke and are surrounded by enemy titans. As long as the deep left is held, this wave should be very easy. Something worth mentioning about the sniper titans is that they will sometimes spawn in the deeper right side and will stay there; these are good battery/titan meter farming for those who dare.
Wave 4
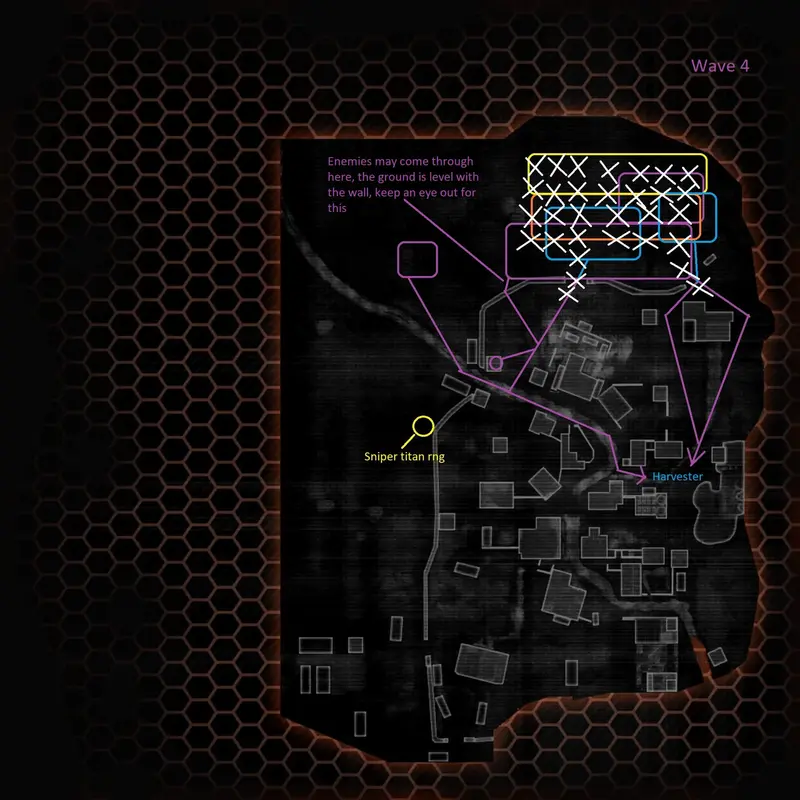
Wave 4 will take the pilots to focus all efforts on the right side chokepoints. The majority of the first wave will be off-angle right choke, then right side choke later on. All arc traps previously placed will now need to be moved to the entire field that is on the right side beyond the wall (As shown in the illustration). The arc traps will make that entire area easier to deal with. This wave will start with a nuke titan and a cloak drone over by deeper mid, this should be taken care of by a lone pilot. The rest of the team will need to hold the choke points, and you guessed it, these choke points have map-deployed smokes on off-angle right and right chokes. If you have a Scorch or Monarch titan, this is the perfect place to defend. This wave is actually pretty easy as all of the enemies that spawn, them being sniper, mortar, Scorch, arc titan, reapers and some other titans all bunch up, perfect for laser core and smart core to deal a massive amount of damage, this area is one of the perfect laser core opportunities as a huge amount of enemies are exposed. Whoever holds the off angle right side will need to be a healthy titan, and must know how to deal with swarms of enemies such as arc titans as they will chip away health fast, the other 2 pilots must assist this pilot by killing any reapers or titans that enter through the area next to the choke that has even level with the wall, keep this in mind at all times. At some point, the smoke dissipates, which you will need to keep an eye out for, as the enemies will fire immediately upon any visible enemy in the smoke. Halfway through the wave some enemies will begin to start running towards the other chokepoint via the short right pathway to harvester, one pilot must hold the right side choke point as to not let any enemies through, it is very important that no enemies leak through, this will make the pilots need to retreat to deal with the enemies that got pasts which will open up other enemies to coming towards the harvester this will compound, if the team gets overrunned then they can hold the titans at mid and short mid but this is never ideal. Now, back to the last parts of the wave, the rest of the enemies will only go towards the right side instead of off-angle right, assuming some people need a new titan. This is the perfect time to titan meter farm, as a few Scorch, nuke, and arc titans will spawn. They will all proceed to walk towards the harvester via the right side. After the last few nukes and arc titan, this wave should be complete. One important thing to note is that there will be a lot of sniper titans, so be careful. Other than that, this wave is an easy win.
Wave 5
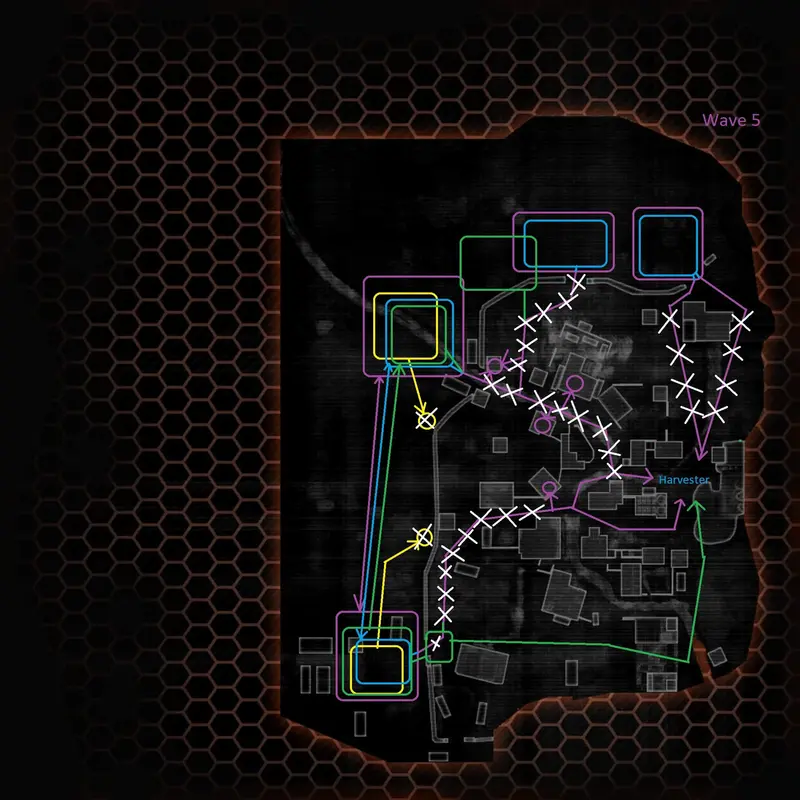
Wave 5 is going to be a combination of every previous wave. There will be drones, sniper titans, luckily no mortars, and a lot of enemies. First things first, during intermission, all arc traps on the right plain must be picked up and moved, as now they will have to be placed in every lane and all sniper titan spots, as shown on the illustration. Beginning of this wave will have drones, some drones will take off angle left so keep this in mind, the other swarms of drones will go down the mid and short mid paths, other enemies spawn in deep right, deeper mid, off angle right, All 3 areas will start having reapers and grunts, additionally for deeper left and deeper mid will get a sniper titan and a nuke titan. This wave will have a lot of cloak drones, so make sure to take them out when they are visible. Some reapers after warpfalling will begin to vault over the walls that separate the map, just like in wave 3. Soon after, deep left and deep mid will be getting more titans and some arc titans. Enemies will begin to flood both the left and mid pathways to the harvester, effectively combining wave 2 and 3. Arc titans will also begin to spawn. These first 4 arc titans that spawn will titanfall on the opposite sides of where they will enter beyond the wall. This gives crucial time to damage the arc titans before they get too close. After these two major waves, some more straggling ions and other enemies will come down the deep left lane; one pilot should stay back to deal with them. During this time, a huge number of titans will spawn on the off-angle right. This group will go from off-angle right to the mid lane towards the harvester. This will be spearheaded by an arc titan, followed by Legion and nuke titans. While this portion of the wave spawns another wave will spawn in deep right, this portion will consist of only nuke and arc titans, this part of the round is extremely dangerous and typically results in a loss of harvester and/or titans as the arcs and nuke titans will take both lanes of right and short right rush towards the harvester, so it is very important that all militia pilots have titans as 3 - 4 people will be needed to defend the harvester, depending on what is left on the other lanes, one pilot should pick the right side once the titans deploy on deep right, so positioning will matter greatly. Arc titans must be held back and destroyed asap, electric smoke and cores should be used liberally. Additionally, if the two lanes are arc trapped, it will prove very useful as the nuke titans will be slowed, buying crucial time, hence the arc trap placement in the illustration on the right side. So, in summary, for wave 5, try to survive so that the last portion of arc titans and nukes don’t kill the harvester. Many losses have occurred at this portion of the wave due to people not surviving long enough.
Post Summary
Colony is a very punishing map. Thankfully, those map-deployed smokes can make your life much easier so make use of them. Colony provides many areas of cover and good peaking areas for free damage; make note of them the next time you play. Use guerrilla tactics as the snipers cant really hit you unless you are far forward, destroy the sniper titans and cloaked drones, and the match will go much more smoothly, always destroy all of the cloaked drones before killing the last cloakable enemy. Arc traps are very important and must be moved to areas where enemies will be, so whoever is going to be placing traps will have the responsibility of picking them up. If you don’t wish to do that, then donate money to the armory. Some other final notes are that Colony will have some rng when it comes to reaper perches, sometimes they will jump onto perches, and sometimes they will run towards the harvester; nonetheless, a single reaper should not be alive, so don’t take any chances. If you decide to go pilot only, then communicate with your team to kill the sniper titans as soon as possible, or else your life will end very abruptly. Legion drill shot will find much use on Colony, as titans tend to line up; a proper powershot can result in insane damage. Northstar’s piercing shot kit is also noteworthy for this map. That will be it for the Colony Guide. Good luck, pilots.