Angel City
Pre Summary
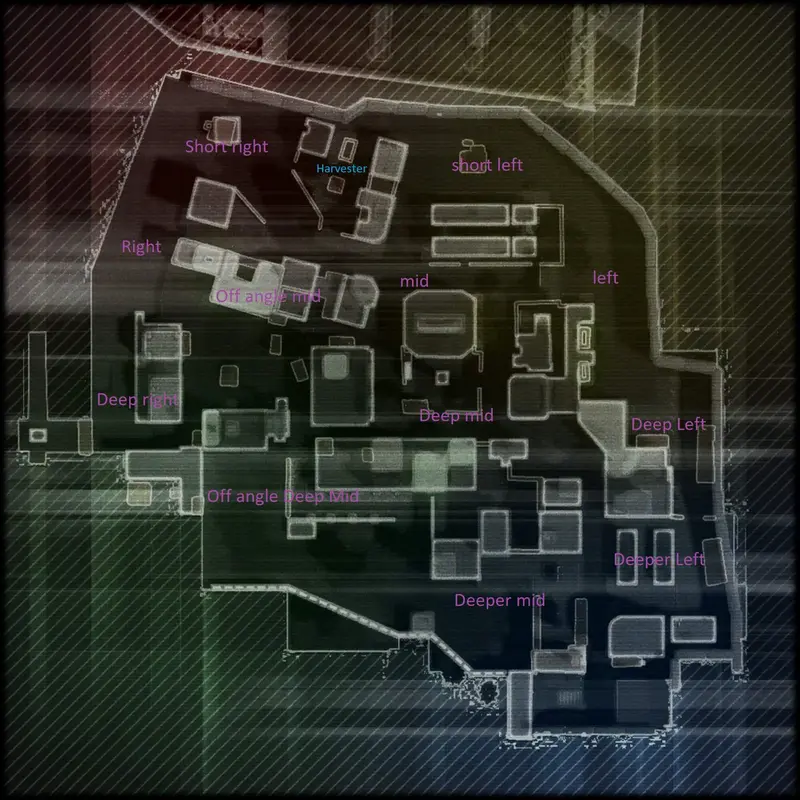
Angel City on Frontier Defense can be an easier map if the pilots know what to do and what to expect. The major threat on this wave is the mortar specters, mortar titans, waves of Arc titans, and the typical tick spawning reaper. The enemies that don’t spawn on the Angel City map are Monarch, Legion, Ion, Northstar, ticks(from drop pods), and plasma drones. In Angel City, the pilots will need to move arc traps during intermissions since each wave will have vastly different spawn points for enemies. So whoever buys arc traps will need to keep this in mind. Grapple and sniper rifles will work very well on this map due to the many high vantage points. Titans like Scorch and Northstar will do well in Angel City due to the tight, long corridors. Tone can have some trouble, but she works well most of the time. With the proper roaming and team coordination, this map is a guaranteed win.
Wave 1
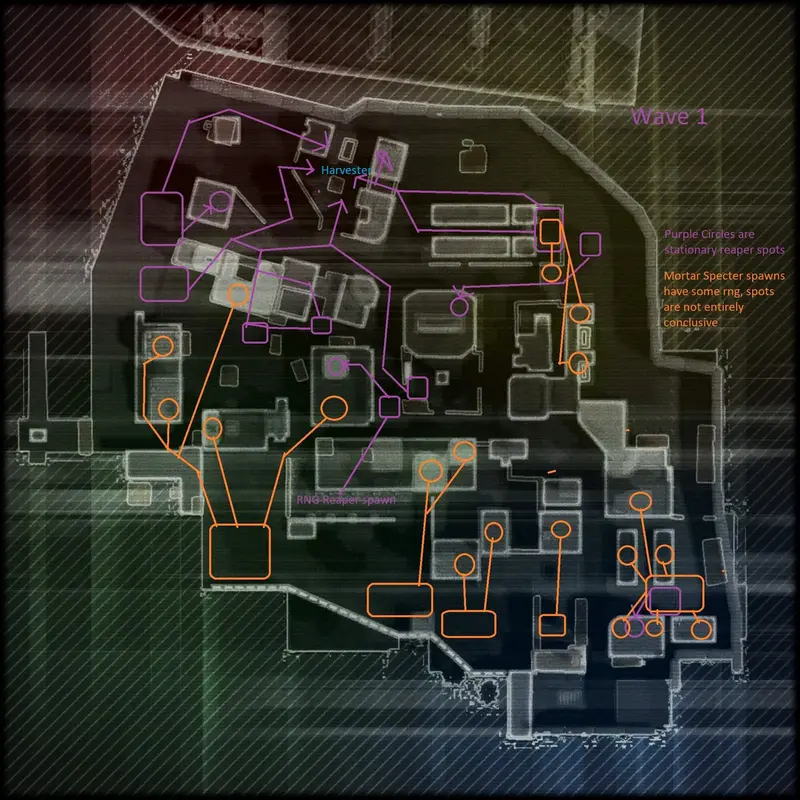
Wave 1 on Angel is perfect for sniper and grappling pilots. Tons of mortar specters and some reapers will spawn. This wave will have RNG on where the first and subsequent enemies spawn, that being short right, right, and deep right, or it can be the left side. The first enemies can spawn in the deeper left as well. Pilots should spread out and keep an eye out for these spawn locations. Wherever the first spawn is will be easily visible by the location of the first reaper warpfall. Make sure to always kill the reapers asap before they start producing ticks. Specifically, the reaper that spawns in the short right will fire its rockets at the harvester, making it a top priority as well. You can spawn camp the reapers by placing satchels in areas where the reapers warpfall on for an instant kill (shown in illustration). After the first spawn, it will go clockwise or counterclockwise with spawning. More mortar specters and reapers will spawn, so make sure to dispatch them. Soon after the 4 “parts” of the main mortar specter wave are done, grunts will begin to spawn in areas around the harvester. Keep in mind that stalkers will be spawning in the right and in the deep mid. They will go straight towards the harvester as shown in the illustration. Keep that in mind so you don’t get surprised by an EPG rocket. Some grunts will go inside the building next to the harvester, and some will come from the short right side building as well. If done correctly, this wave should be very easy. Since no titans spawn this wave, you can get away with using non-grenade launcher weapons.
Wave 2
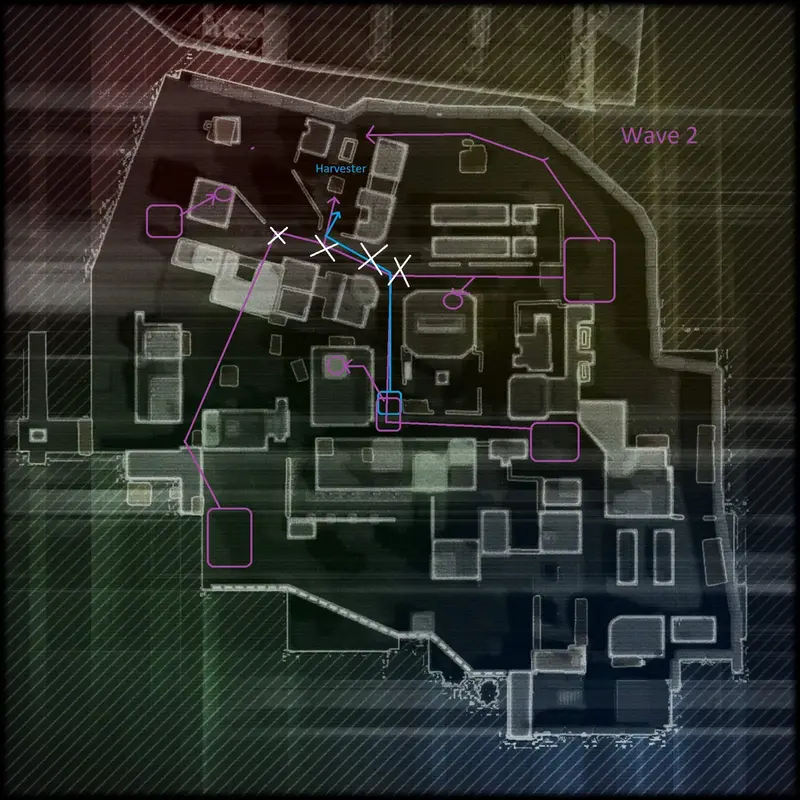
This wave is very similar to wave one; there will be RNG in where the first enemies will spawn. This wave will introduce cloaked drones, Scorch titans, some Ronin titans, and an arc titan. To begin, 2 waves of enemies will begin to attack the harvester from only two of the 3 possible spawns, these being left, deep mid, and off-angle deep mid. The first enemies that spawn are some reapers and stalkers with cloaked drone support. Once these smaller waves are defeated, some Ronin titans, reapers, and stalkers will begin to deploy with cloaked drones in the same areas. Soon after, a Scorch titan will deploy in each spawn point, followed by Reaper spawns in certain areas(shown on the illustration). These reapers will immediately jump onto buildings and begin to deploy ticks and fire upon militia forces and harvesters. It is imperative that these reapers be destroyed quickly. Be very careful of the Scorch spawns, as they will be cloaked and will destroy your titans by surprise if you are unaware. A lot will happen very quickly in this moment of the round, so teamwork and focus fire on the reapers and cloak drones will make the round much easier. At the end of the wave, one arc titan will titanfall in deep mid, make sure to destroy it as well. Rarely, it can also spawn in off-angle deep mid, but that is extremely rare; this has only happened once in my playthroughs. For the final enemies, some grunts will spawn on the left side and make their way across to the harvester.
Wave 3
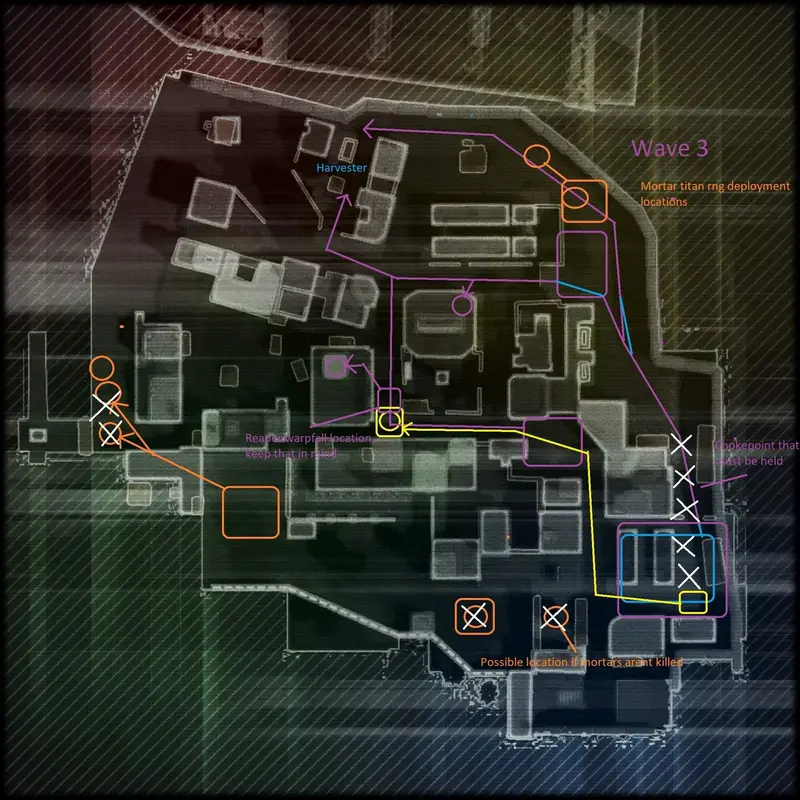
Wave 3 is where arc trap placement is going to be crucial. During intermission, all of the possible mortar spots will need to be arc trapped(shown in the illustration). Mortar titan spots are a priority, as a lot happens during this wave after the initial nuke titan wave. To start, some tone titans and nuke titans will be spawning on the left and deep mid. After some initial nuke spawns, the left side will be getting 2 arc titans. Make sure to destroy the arc titans before everything else, as they are very dangerous. During the initial wave, reapers deploy and will begin producing ticks in the same areas as in wave 2. Make sure these reapers are destroyed as soon as possible, as they will fire upon the harvester and nearby militia titans. You can also arc trap the reaper perch locations if needed to make them easier to dispatch; still, mortar titan areas must be a priority. After the initial waves, a few reapers and a Tone titan will deploy in the deeper left and will proceed to the harvester in the left to the short left path. That is where one pilot will need to split up. One player will need to destroy all of the mortar titans as they will begin to spawn shortly after the tone and reapers are destroyed. For the rest of the team, a huge wave of reapers, Scorches, and Tones will begin to spawn in deeper left, making their way to the harvester down left, short left, and mid, and will split between those two lanes if they aren’t killed. This portion of the wave has the most enemies and the most dangerous types of enemies, making it extremely important to hold the chokepoint. It is imperative that the 3 players hold the chokepoint at all costs. After the reapers, Scorches, and Tones are defeated, a huge portion of arc titans will spawn with the same pathing as the previous enemies. This can be extremely difficult to defend against, so titans with piercing attacks and AOE attacks should do very well. Legion’s drill shot can work very well in this part of the wave, as enemies tend to line up. The same applies to Northstar’s piercing round kit. After the big part of the wave, a sniper titan would have positioned itself nicely in deep mid, perfect for titan meter/battery farming. 2 more mortar titans will spawn on the left side, as shown on the map, after the main waves are destroyed. These are also good battery/titan meter farms if needed.
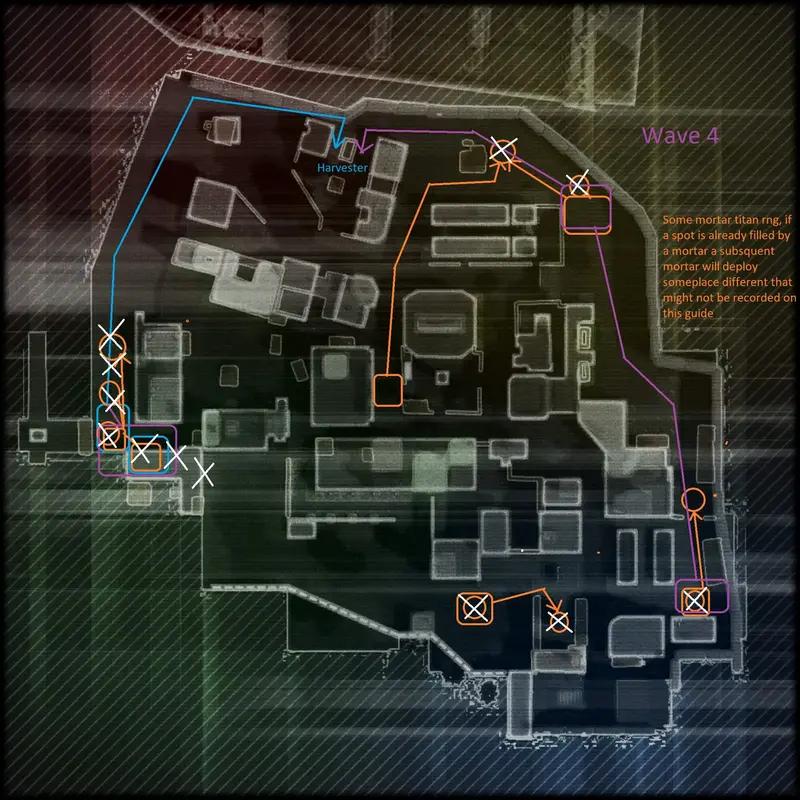
Wave 4
Wave 4 is the mortar titan wave, a lot of mortar titans will deploy in many areas across the map, arc traps placed in the deeper left choke point and should be moved to other areas across the map, mortar titans spawn in all of the areas in previous wave 3 and some additional places specifically for this wave, depending on how fast the mortar titans die they can deploy in places that haven’t been discovered before. Arc traps that were placed for reaper perches and that chokepoint should be moved towards the new mortar locations and deep right. This wave will begin with initial mortar titan spawns, then, after a few spawns, a large number of mortar titans will begin to titanfall on the map. Easy to dispatch, just make sure all players are spread apart. The dangerous part comes when deep right spawns arc and tone titans, they will move towards the harvester via the right and the short right side. Whoever is responsible for that side should head back and use range attacks. While that portion of the wave spawns, the deeper left side will get some reapers and a Tone, so one player should stay deeper left until those enemies are destroyed. The last part of this wave will have a tone and 2 scorches spawn on the left side. Don’t underestimate the Scorch Titans, and you will be fine.
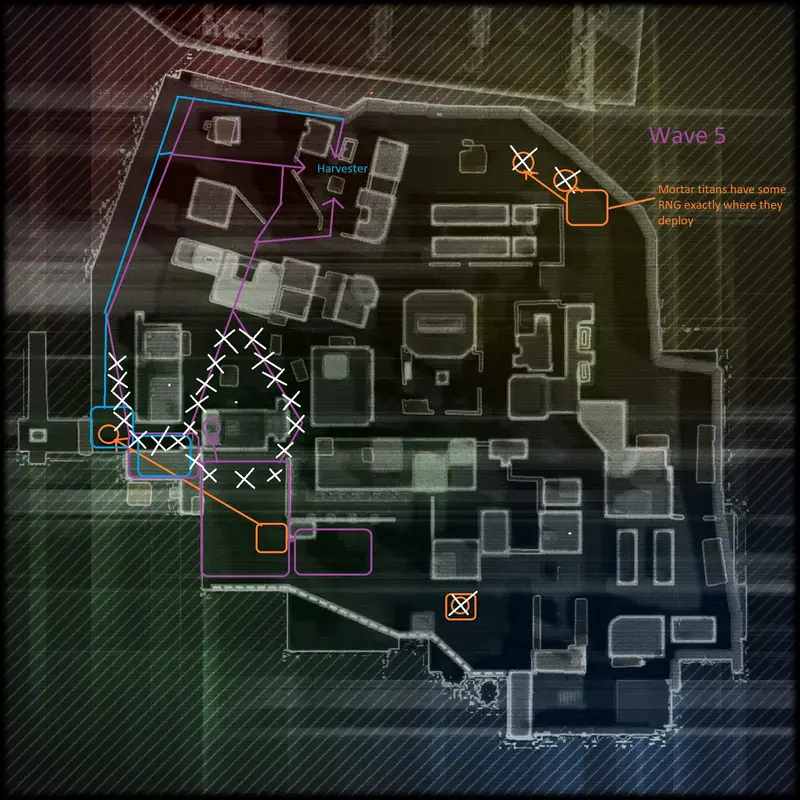
Wave 5
The final wave will have way fewer mortar titans, so arc traps can be moved from previous mortar titan spots, excluding the ones shown on the wave 5 illustration. All of the enemies, excluding a few mortar titans, all spawn in deep right and off-angle deep mid. All arc traps should be concentrated in that area, as shown in the illustration. Enemies will split up on which path towards the harvester, but will end up in the tunnel right before the harvester, perfect for AOE abilities in case anyone needs to fall back. One person should focus on hunting mortar titans when they spawn; only about 3 spawn out of the area, so that job won’t take long. Whoever is in the right lane will have the biggest responsibility, as a lot of arc titans will go along that path after the initial wave(they never enter the tunnel path), so use range for your advantage. So, to start, a massive number of reapers will spawn, and they will rush the right-hand lane. After they are destroyed, more titans and reapers will spawn. Then the final part of the wave will have mortars spawn farther away, and nuke titans will begin to spawn with reaper support. A lot of enemies come out very quickly, so be prepared. After the nukes spawn, the right side will begin to have arc titans spawn, forcing the militia team to split their firepower. Arc traps should help considerably with this wave. After all of the arc titans are defeated, the match should be completed.
Post Summary
Angel City can be a very tricky map to deal with; this guide can help considerably. With proper positioning and arc trap placement, this map becomes an easy free win. Make use of the hallways by using titans with AOE/piercing attacks, as their value really comes in. Have a dedicated roamer player to hunt those mortars for waves 3, 4, and 5. For wave one, make sure to dispatch reapers as soon as they warp fall, which will make things much easier. Remember that wave 1 and 2 spawns will have RNG in where they spawn. That will conclude the Angel City guide, pilots.
Acknowledgements
Credits to Angel_of_Deths for their assistance provided during illustrations.